
Import Data from Snowflake to Netcore
Import Snowflake contact data to power targeted campaigns and journeys in Netcore CE.
Pre-requisites
- You must have an active Snowflake connection already configured in Netcore CE. See Snowflake Integration with Netcore.
- You must have read access to the Snowflake warehouse, database, schema, and table you want to import from.
- Decide in advance which Netcore CE list, if any, you want imported contacts added to, and which email address should receive import alerts.
Start a Snowflake Data Import
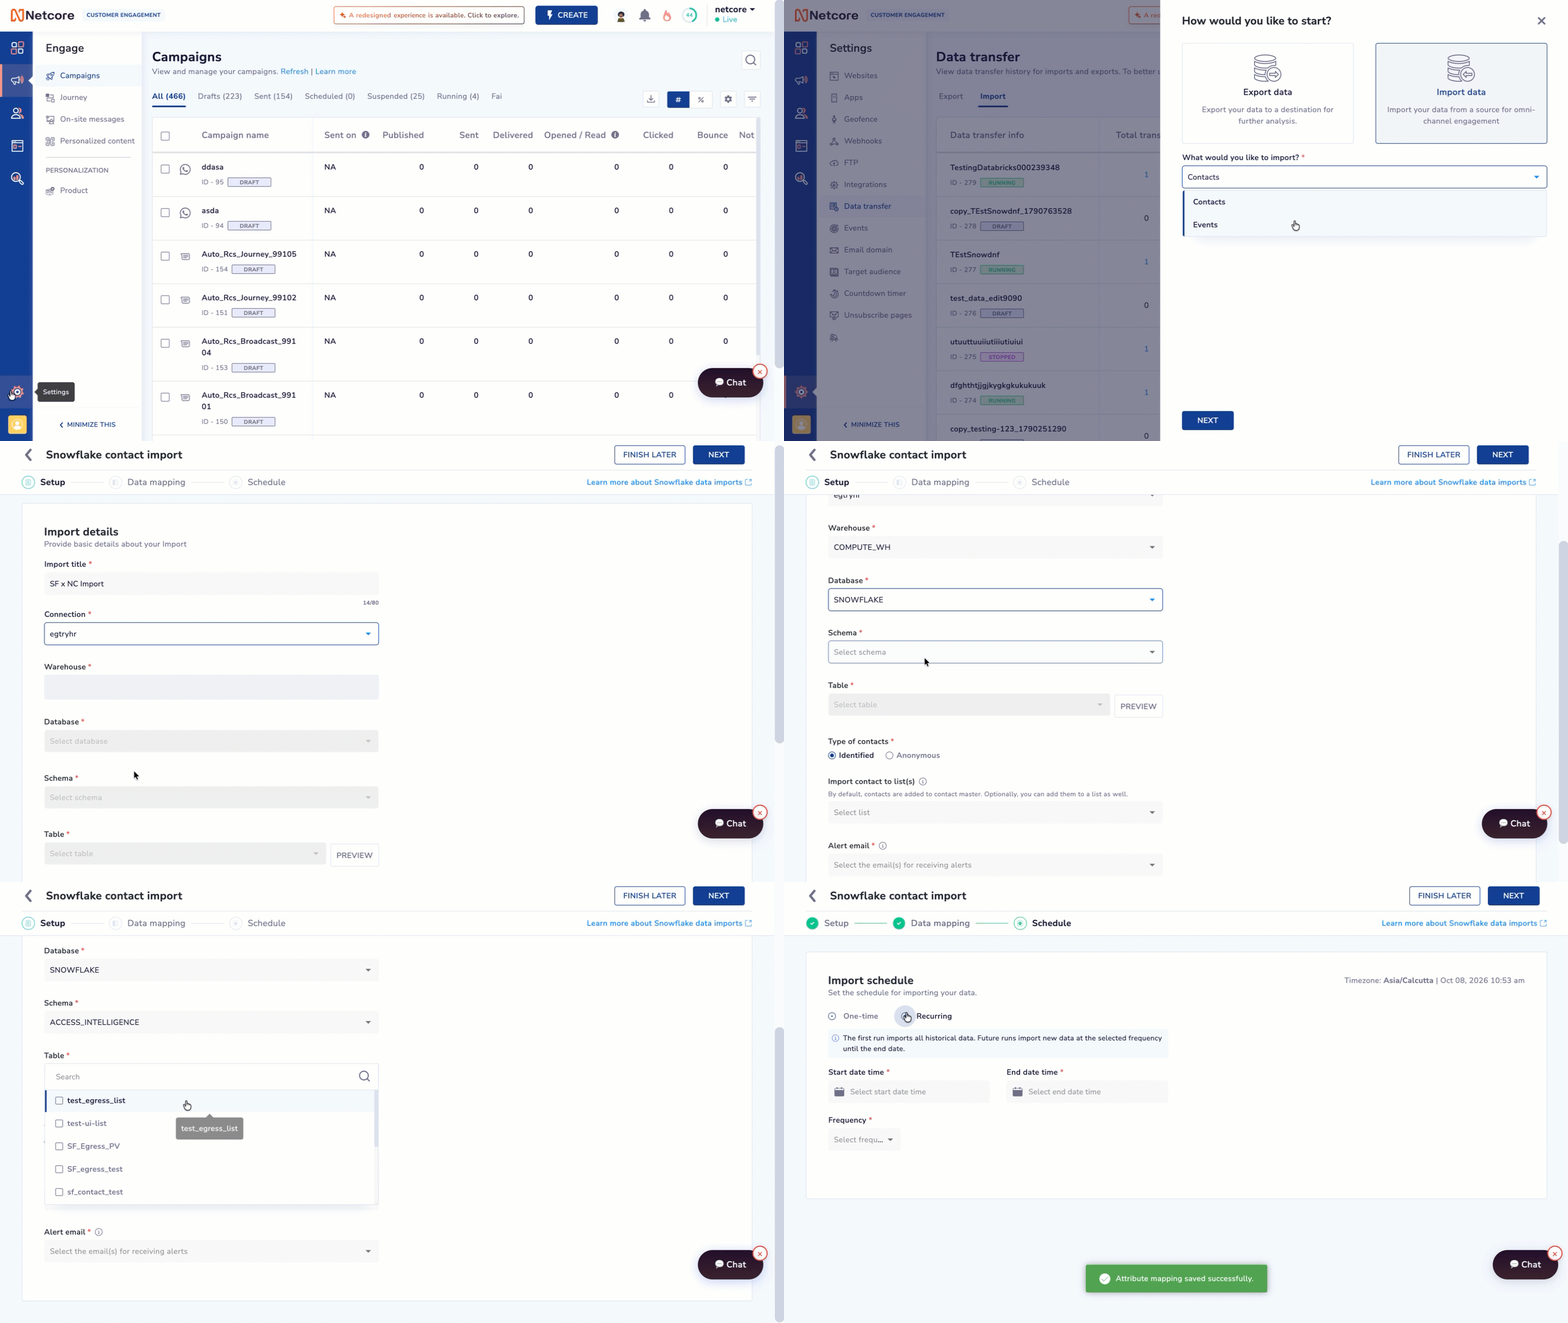
Import Data from Snowflake to Netcore
Follow the steps below to start an import.
- Log in to the Netcore CE dashboard and navigate to Settings > Data transfer.
- Click the Import tab.
- Click CREATE NEW. A panel titled "How would you like to start?" opens with two options: Export data and Import data.
- Select Import data.
- Under "What would you like to import?", select Contacts.
- Click NEXT.
- A panel titled "Select a source to import your data" opens, showing two sources: Snowflake and Databricks.
- Click Snowflake.
This opens the Snowflake contact import wizard. It has three steps: Setup, Data mapping, and Schedule. A "Learn more about snowflake data imports" link is available at the top of the wizard. You can click FINISH LATER at any point to save your progress and return to it later.
Step 1: Setup
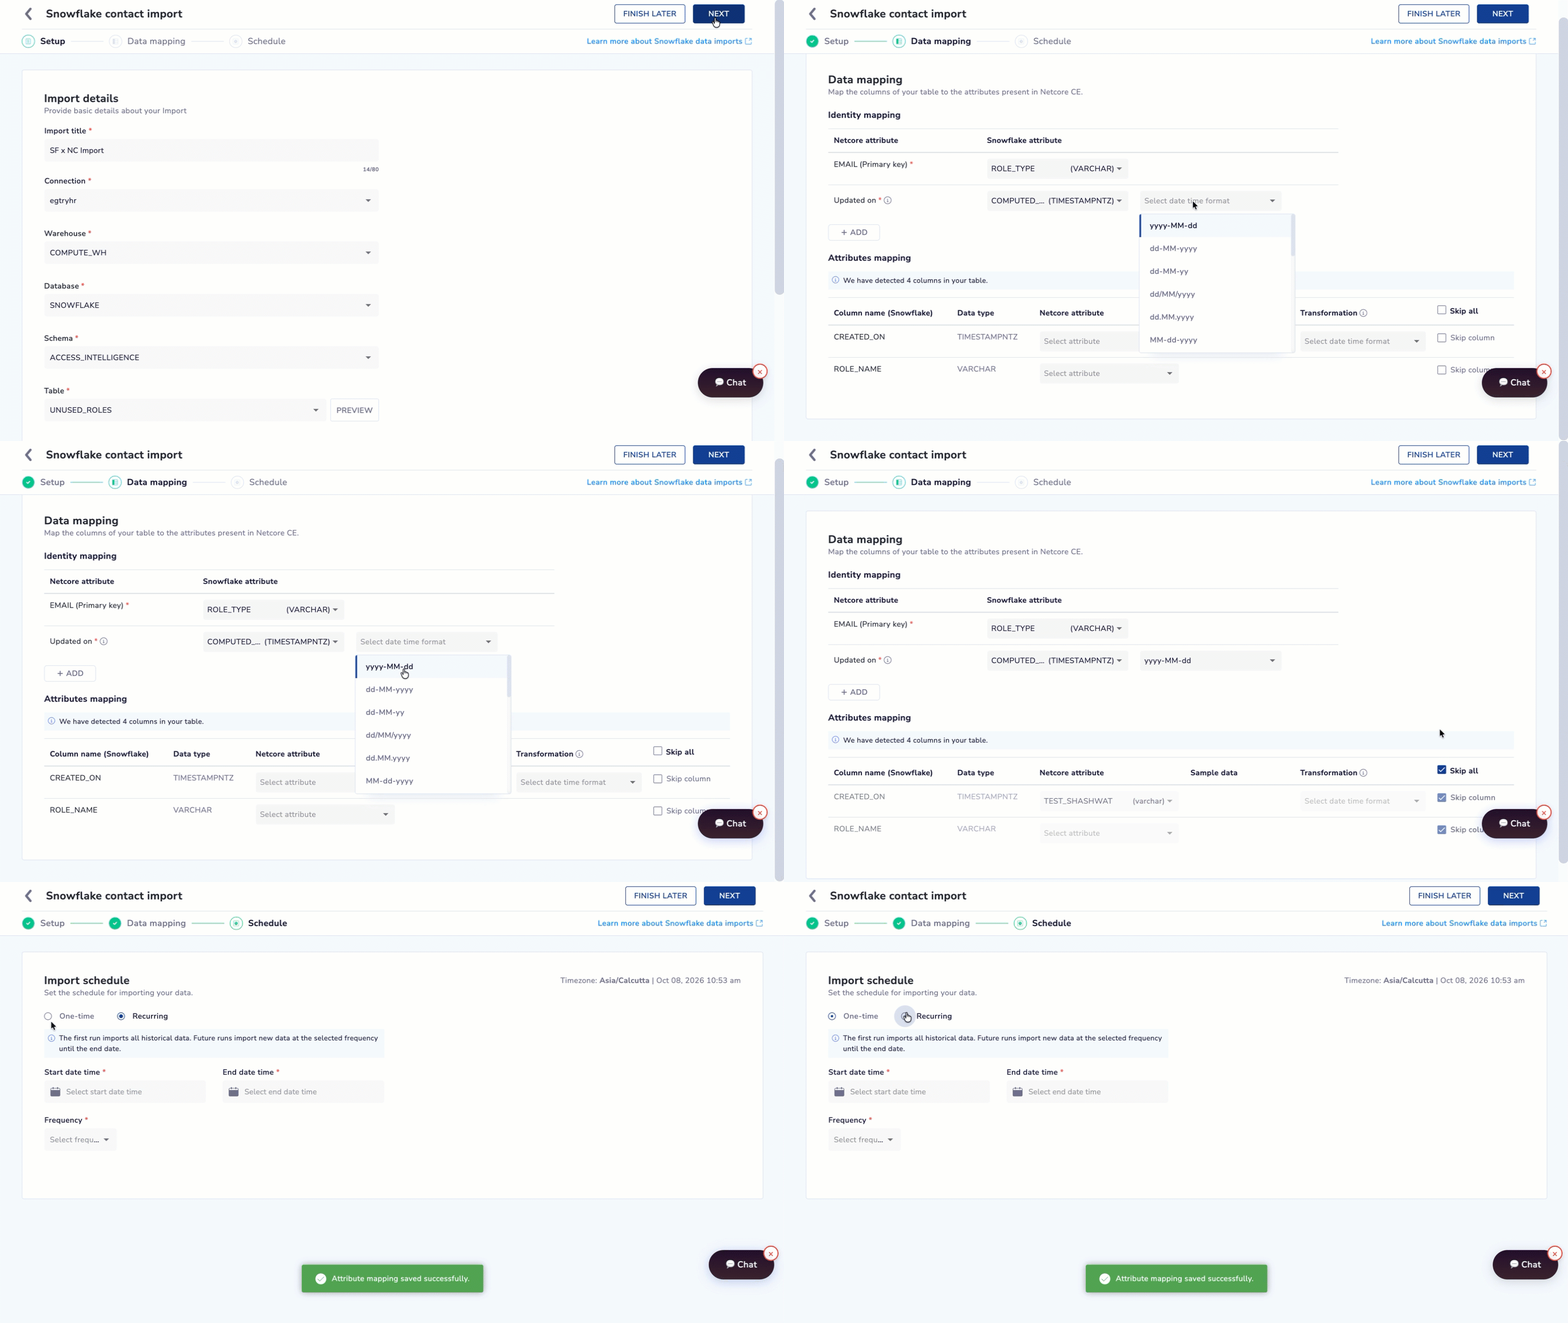
Provide basic details about your Import
The Import details section asks for basic details about your import.
| Field Name | Description |
|---|---|
| Import title | A unique name for this import. Up to 80 characters. |
| Connection | Select an existing Snowflake connection, created earlier under Integrations. |
| Warehouse | Select the Snowflake virtual warehouse to use. This field appears after you select a connection. |
| Database | Select the database to import from. Appears after you select a warehouse. |
| Schema | Select the schema within the selected database. Appears after you select a database. |
| Table | Select the table or view to import contacts from. Appears after you select a schema. |
| Type of users | Choose Identified or Anonymous for the imported contacts. |
| Import contact to list(s) | Optional. By default, contacts are added to the contact master. Optionally add them to one or more lists as well. |
| Alert email | Select the email address or addresses to receive alerts about this import. |
Previewing the Table
Once you select a table, a PREVIEW button becomes available next to the Table field. Click it to open "Table preview: [table name]," which shows a small number of sample records with their column names and values.
Note"Sample records are shown to help you verify the data. Please perform a quick sanity check before proceeding with flow activation."
Use the preview to confirm you have picked the right table before you continue.
Click NEXT to move to Data mapping. Your setup details are saved automatically at this point.
Step 2: Data Mapping
This step is titled "Data mapping: Map the columns of your table to the attributes present in Netcore CE."
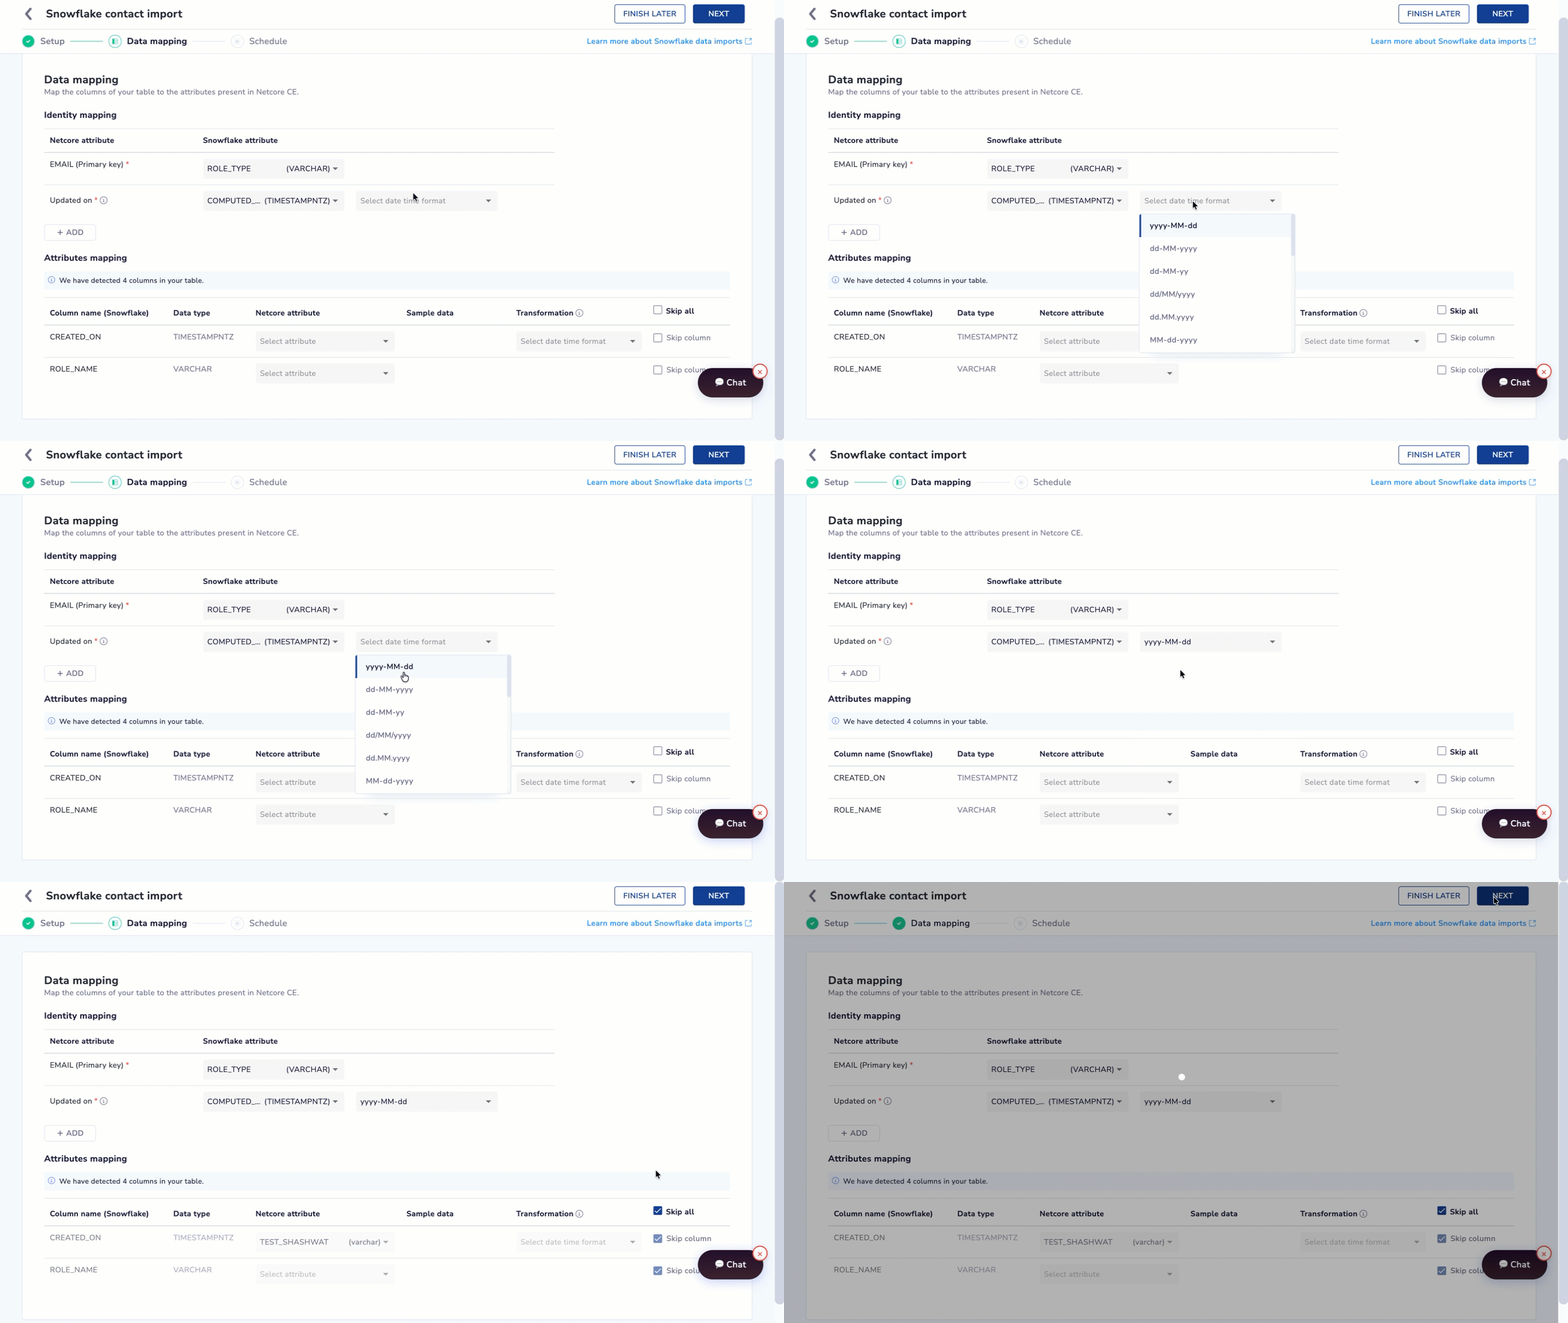
Map the columns of your table to the attributes present in Netcore CE.
Identity Mapping
Identity mapping tells Netcore CE which Snowflake column to use to match and update contact records.
| Netcore attribute | Requirement |
|---|---|
| EMAIL (Primary key) | Required. Map to the Snowflake column that uniquely identifies each contact. |
| Updated on | Required. Map to a Snowflake column that stores when a record was last updated. |
Click + ADD to add further identity mapping rows if you need them.
When you map Updated on to a column, a date time format dropdown appears next to it. Available formats include:
YYYY-MM-DDYYYY/MM/DDDD/MM/YYYYDD-MM-YYYYDD-MM-YYYY hh:mm:ssYYYY-MM-dd HH:mm:ss.SSS XX
ValidationIf the column mapped to Updated on is not a timestamp type, or if you have not selected a date time format for it, the field is outlined in red. Clicking NEXT shows the error "Please select a date-time format for 'Updated on'." Correct this before proceeding.
Attributes Mapping
Below Identity mapping, Netcore CE shows a note: "We have detected [N] columns in your table." This count reflects only the columns not already used in Identity mapping.
For each detected column, you see:
| Column | Description |
|---|---|
| Column name (Snowflake) | The source column name, for example CITY or SIGNUP_TIMESTAMP. |
| Data type | The Snowflake data type of the column, for example VARCHAR, TIMESTAMPNTZ, or TIMESTAMPTZ. |
| Netcore attributes | A searchable dropdown of existing Netcore CE attributes, filtered to compatible data types. |
| Sample data | An example value from the previewed table for that column. |
| Transformation | For timestamp type columns, a "Select date time format" dropdown, using the same format list shown above. |
| Skip column | A checkbox to exclude the column from this import. |
A Skip all checkbox above the table lets you check or uncheck every row's Skip column checkbox in one action.
Creating a New Netcore Attribute
If no existing Netcore CE attribute matches a column, open its Netcore attributes dropdown and select + Create attribute to create one without leaving this screen.
ValidationEvery detected column must be either mapped to a Netcore attribute or marked as Skip column. Clicking NEXT with an unresolved column shows the error "Please map or skip the columns you don't wish to import." Resolve every row before proceeding.
Click NEXT to move to Schedule. Your attribute mapping is saved automatically at this point.
Step 3: Schedule
This step is titled "Import schedule: Set the schedule for importing your data." Your account timezone and current date and time are shown at the top of the page, for example, "Timezone: Asia/Calcutta."
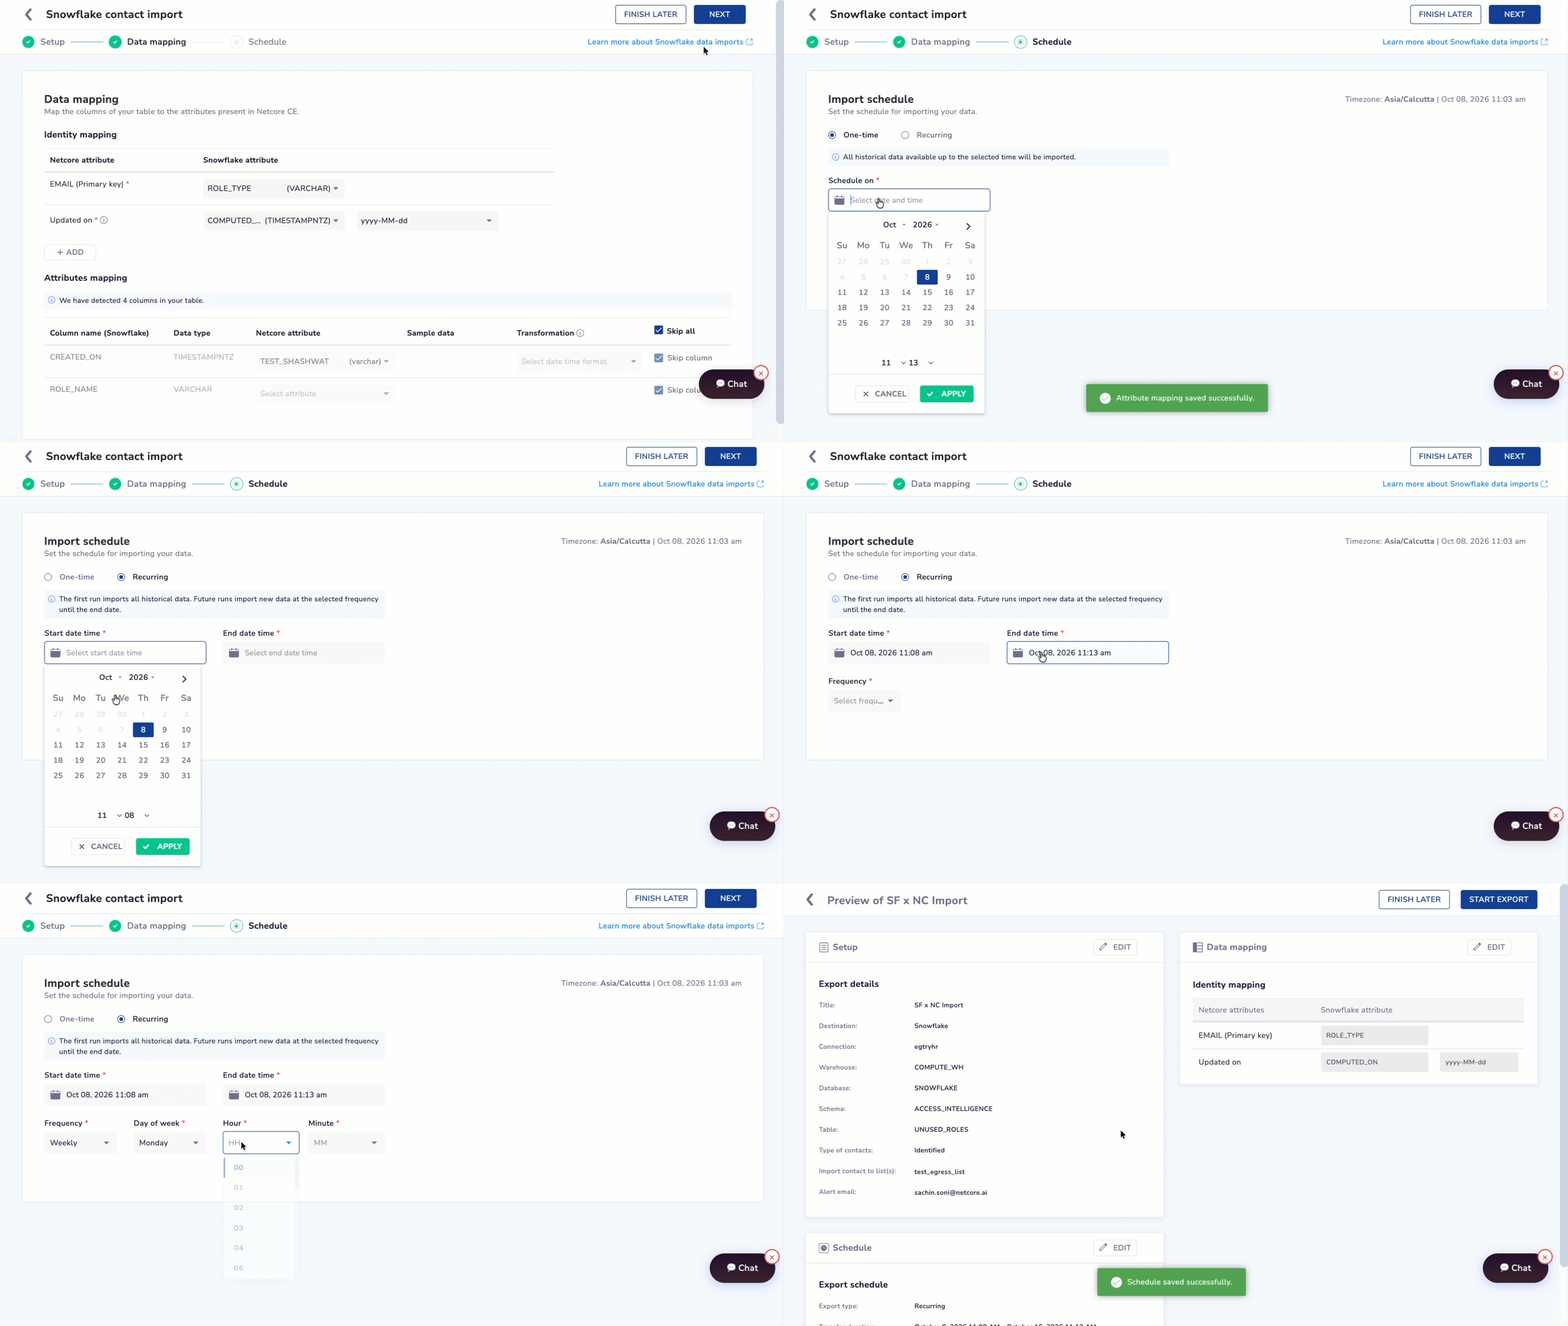
Set the schedule for importing your data
Select one of two options:
| Option | Behavior |
|---|---|
| One-time | "The system will fetch and transfer the complete dataset available in the selected table or view. No incremental or ongoing transfer will be performed." |
| Recurring | "The first run transfers the complete dataset from the selected table/view. All future runs will transfer incremental data based on the configured schedule." |
One-time Fields
| Field | Description |
|---|---|
| Scheduled at | The date and time to run the single import. |
Recurring Fields
| Field | Description |
|---|---|
| Start date time | When the recurring schedule begins. |
| End date time | When the recurring schedule ends. |
| Frequency | How often the import repeats. TBD: the available frequency options were not shown in the recording. Confirm the choices in your account. |
NoteThe recording ends at this step before a final activation control is used. TBD: confirm what completes and activates the import after the Schedule step (for example, a final Activate or Finish button) in your account.
Import Status and Monitoring
The Export tab of Data transfer lists each transfer with columns such as Data transfer info, Last transfer date, Next transfer date, Destination, Module, Frequency, Creation date, Completion date, Total transfers, and Event type, along with a status badge (for example Running, Draft, Paused, or Stopped).
NoteThis column layout was confirmed for the Export tab. TBD: confirm whether the Import tab of Data transfer uses the same columns and status values for Snowflake imports, since this was not directly shown in the recording.
Error Handling
Two validation errors are confirmed from the recording:
| Error Message | Cause |
|---|---|
| "Please select a date-time format for 'Updated on'." | The Updated on identity mapping is set to a column without a valid date time format selected. |
| "Please map or skip the columns you don't wish to import." | One or more detected columns in Attributes mapping are neither mapped to a Netcore attribute nor marked Skip column. |
Important Notes and Limitations
- Only the Contacts import type was demonstrated. Other data types the "What would you like to import?" dropdown may support are unconfirmed.
- Snowflake and Databricks are the only two sources offered for this import flow. Databricks itself is listed as Coming soon under Integrations, so confirm its current availability before selecting it here.
- Frequency options for a Recurring schedule were not shown in the recording.
- The final step that completes and activates an import after Schedule is not confirmed. Confirm this in your account before relying on this guide for a full end to end run.
Updated 1 day ago