For AI agents: visit https://cedocs.netcore.ai/llms.txt for an index of all pages formatted in Markdown and endpoints in OpenAPI. Append .md to any documentation page URL to get its markdown version.
Learn how to create an App Push using the Netcore CE dashboard.
Discover the prerequisites, a step-by-step guide to create an app push campaign, and detailed explanations for each section here.
📘
Prerequisites
Integrate Netcore SDK in your application. Refer here to integrate App SDK into your application
Steps to Create App Push
Follow the steps to create an App push campaign.
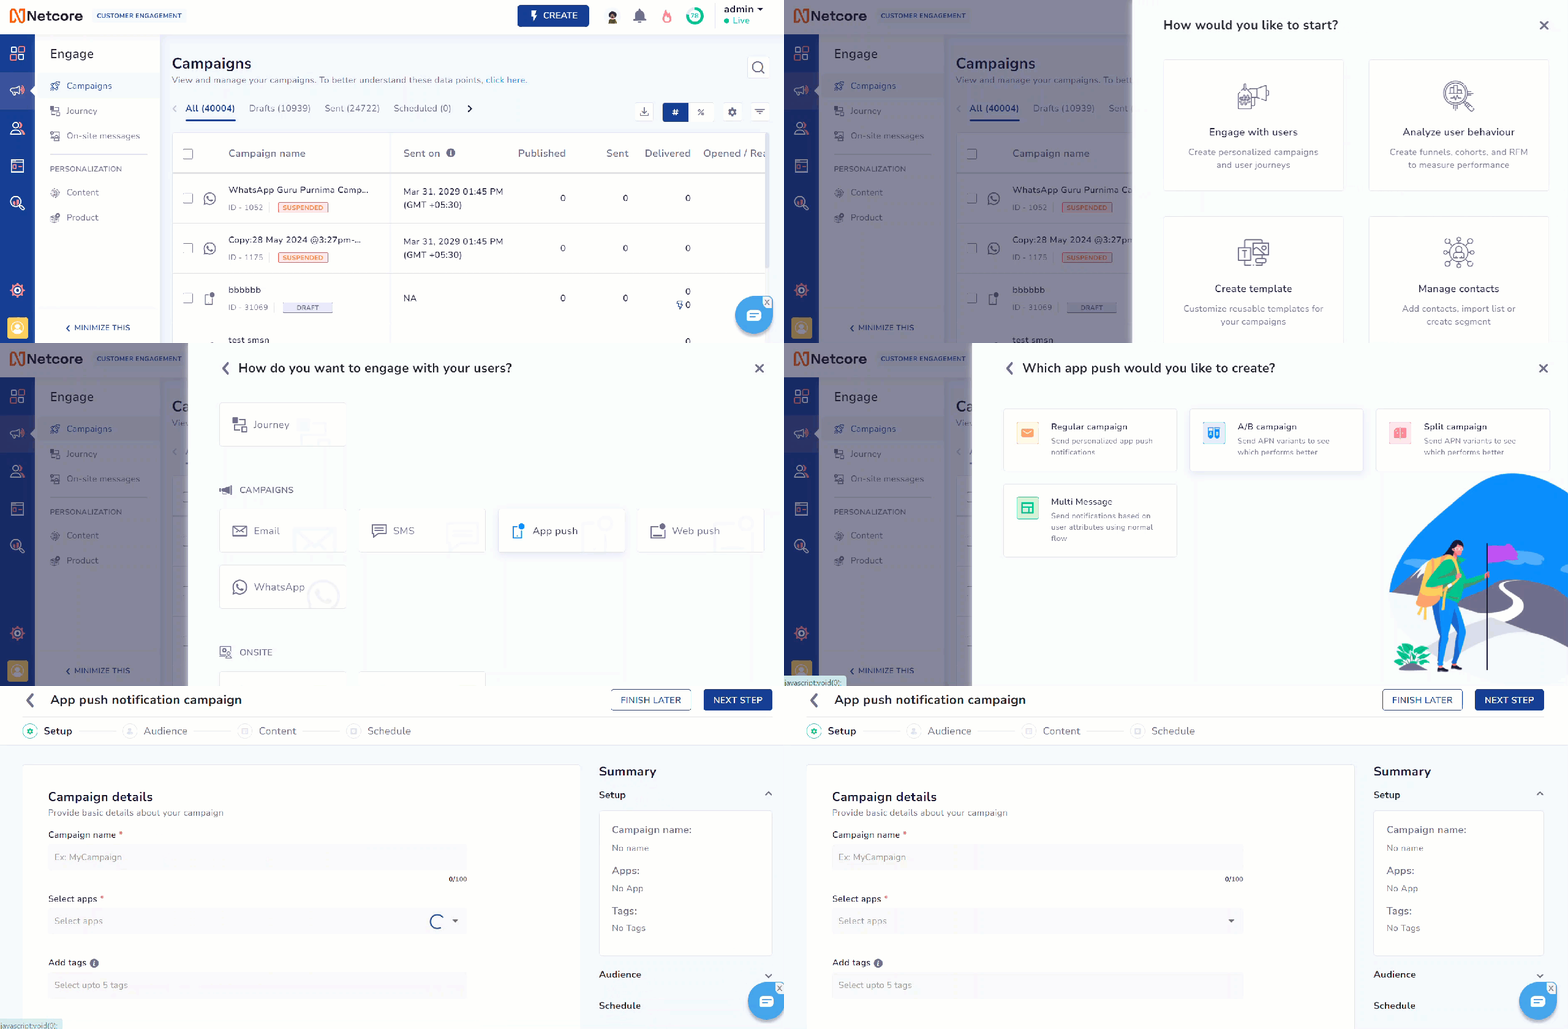
Log in to the Netcore CE dashboard.
Click the Create button on the dashboard homepage. OR Navigate to Engage > Campaigns > Create.
Select Engage with users > App Push under Campaigns. Select the App push type you want to create. The available App push types are Regular campaign, A/B Campaign, Split and Multi Message.
Create an App Push Notification
Setup
4. Add the campaign details here.
Refer to the table below for details on the sections available under Setup.
Sections
Description
Campaign Name
Enter a unique name for this app push campaign.
Maximum length: 255 characters
Allowed characters: alphanumeric, space, a hyphen, underscore, and ampersands (&)
App(s)
Choose the app(s) where this notification will appear.
Add tags
Add relevant tags to organize and categorize this campaign. You can select up to five tags.
Fill in all the required sections and proceed.
Advanced Settings
In the Advanced settings section, you can configure the fields to track campaign performance.
Enable the UTM tracking to add UTM Parameters to track campaign efficacy under Google Analytics' campaign reports. Refer to the table below for details on UTM Parameters.
UTM Parameter
Description
Default Campaign Value
Default Journey Value
utm_source
The source identifies the platform or website from which the traffic originates, such as Google, Facebook, or the newsletter.
Netcore
Netcore
utm_medium
The medium specifies the marketing medium used to deliver the traffic.
{CHANNEL}
{CHANNEL}
utm_campaign
The campaign refers to the specific marketing campaign name or identifier. For example, summer_sale, holiday_promo, or new_product_launch.
{CAMPAIGN_NAME}
{JOURNEY_NAME}
utm_term
The term is used to identify specific keywords or phrases associated with paid search campaigns. For example, running shoes or discount coupons.
Campaign
Journey
utm_content
The content helps differentiate between various versions of an ad or link that direct to the same destination.
None
None
📘
Important Points to Remember
The UTM Parameter values defined in Global Advanced Settings appear automatically when you create a new campaign.
You can edit any of these default values before saving the campaign/journey. This would ONLY affect the campaign/journey settings not the Global Advanced Settings.
When the landing page URL already contains UTM parameters, the values you enter on the Setup page replace those values.
If you leave a UTM field empty on the Setup page, and that parameter exists in the URL, the URL value is kept.
UTM parameters gets added only to landing page URLs and action button URLs and not to non-URL actions like Dismiss, Copy Code, or Remind Me Later.
Set Conversion Goal
Refer to the table below to set up the conversion goal on the Setup page.
Advanced Fields
Description
Set Conversion Goal
Add conversion goals to monitor key business metrics and measure the success of your app push campaign. You can track one conversion goal per campaign. Select any activity as a conversion goal activity according to your objectives.
For example, if you want to track the number of customers who have purchased shoes after your campaign was sent. (Event: Product Search, Product: Shoes).
This is a mandatory field.
Payload parameters
You can define criteria for the conversion event payload. Up to five parameters can be added for customisation.
For example, specify a purchase event when the product price exceeds 10,000.
Conversion Window
Define the conversion window to link user actions to campaigns in a specific timeframe.
Revenue Parameter
Select this option to assign a value to each successful action to track financial impact. This is a mandatory field.
Audience
5. Define the target audience for your campaign in the Audience section.
The Audience section lets you select who to target your App Push. It has the following sections:
Target Audience
Choose a specific segment or list to define the audience for the App push campaign. Pick up to five user segments or lists. Use for targeting based on historical behavior captured by server-side user segments.
Select your target audience for the campaign
Target Audience has the following options:
All Contacts: Target all users in your contact list when creating campaigns.
📘
All Contacts Settings
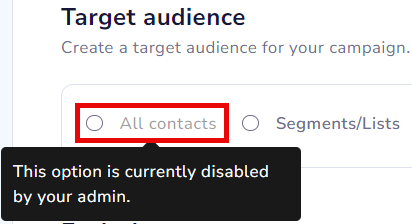
Admin users of the Netcore CE dashboard can disable the All Contacts option, if they prefer not to send a campaign to all contacts. This option is enabled by default, making the All Contacts option selection accessible. However, admin users can change it as needed.
To enable or disable the feature, navigate to Profile > Account Configuration > All Contact Enable/Disable > Active / Inactive.
Enable or Disable All Contacts option
Segments/List: Select from existing lists or segments to target specific contacts. Search for the desired segment or list by name and add it to your campaign with a checkbox selection.
Ad-hoc segment: This lets you instantly create segments, view user counts, and integrate them into your campaign targeting.
User data table (UDT): This is a specialized collection of contact information that includes additional attributes such as email addresses, physical addresses, and other personal details. UDT provides detailed information about contacts to help personalize and target campaigns.
Device Targeting
Choose whether each user receives the notification on their latest active device or on all of their active devices.
Select one of the following:
All active devices(default): The notification is sent to all of the user's active devices, up to their 10 most recently active devices.
Latest active device only: The notification is sent to only the single device the user most recently used.
📘
NOTE
All active devices is selected by default. Campaigns that are already scheduled when this update goes live continue to send to all active devices.
Opted-out and uninstalled devices are always excluded. If you select Latest active device only and that device has opted out or uninstalled the app, the user does not receive the notification- it is not send to an older device instead.
For a campagain that targets both Android and iOS, the "latest active device" is the single most recently used devive across both platforms.
Exclude Contacts
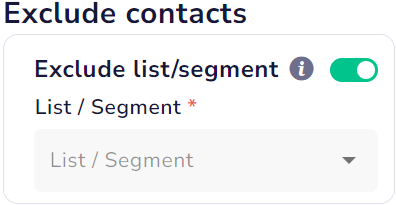
Select suppression segments or lists to exclude specific users from campaign targeting. You can select up to 15 segments or lists for exclusion.
Exclude Contacts from your Campaign
Content
6. Create the content of the app push under the Content section.
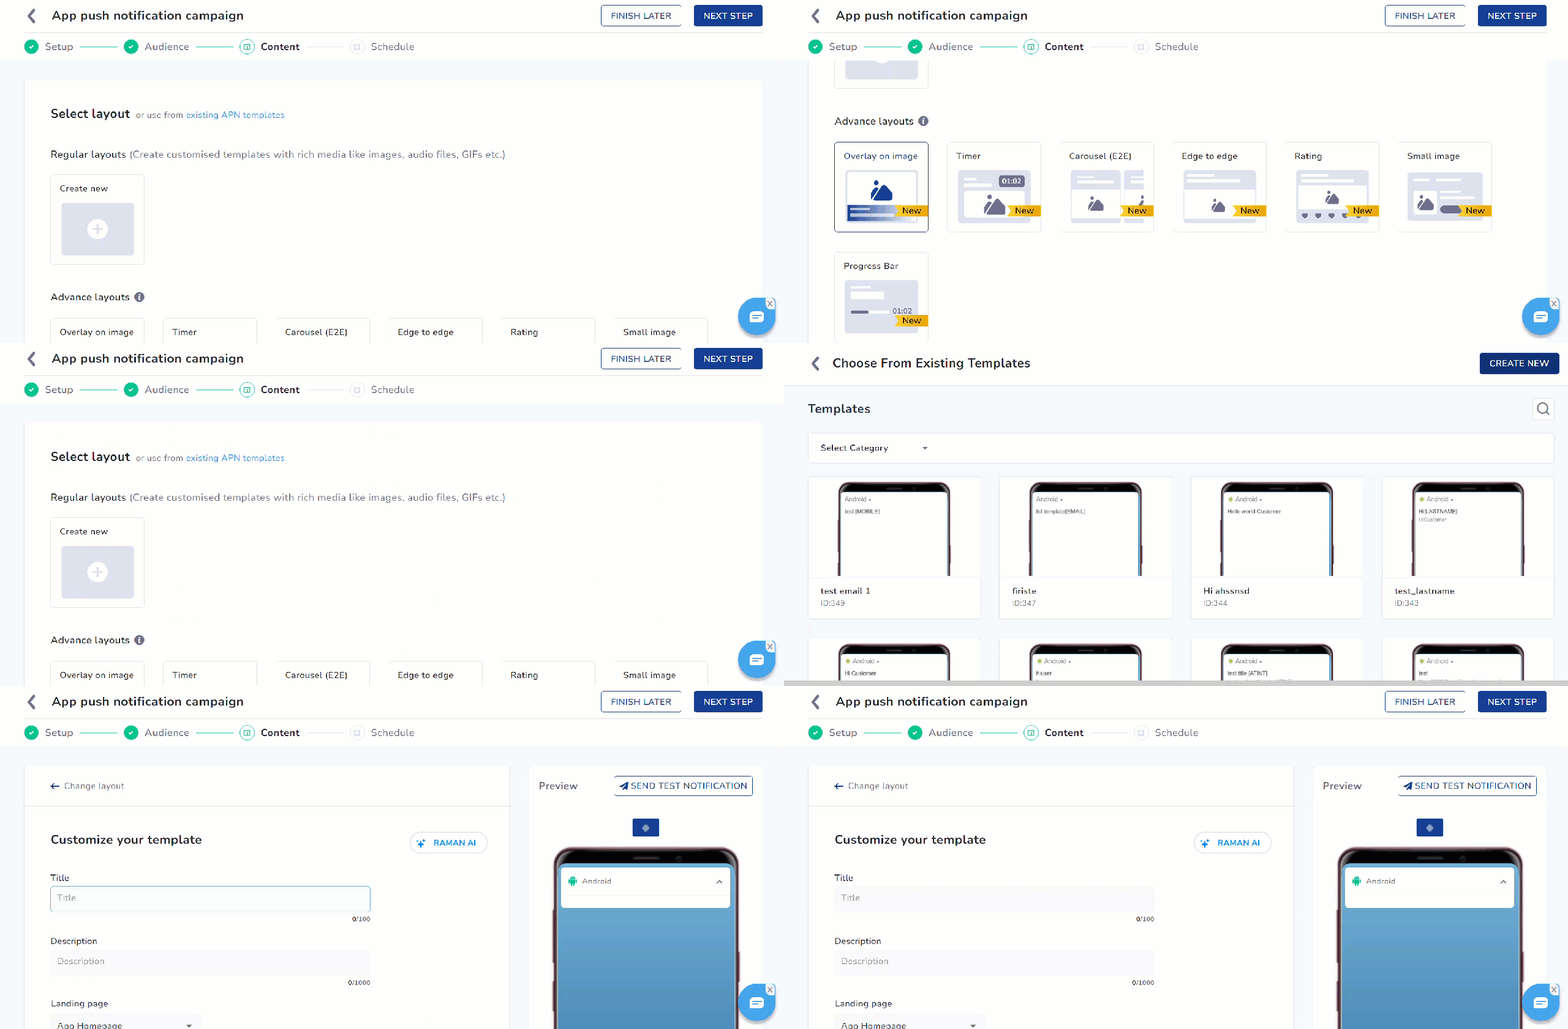
After the basic setup and defining the target audience, Content is the section where you can add the content for your campaign. You can Create new layout, use from existing APN templates, or select from the Advance layouts listed on this screen.
👍
Use Your Active Brandkit
Ensure you have a Brandkit enabled and active to use it while creating App Push campaign content. Refer here to learn how to enable and setup Brandkit.
Several layouts are available to suit your message and audience. Here is an explanation of each layout.
Layout
Description
Use Case
Overlay on Image
This layout allows you to display a message over an image.
Promote a new product with a captivating image and a call to action.
Timer
This layout allows you to add a countdown timer to create urgency.
Notify users that a flash sale will be ending soon.
Carousel (E2E)
This layout lets users swipe through multiple images or messages.
Showcase a series of related products or features.
Edge to Edge
This layout allows you to expand the notification to cover the entire width of the screen.
Highlight a major update or announcement with maximum visibility.
Rating
This layout allows you to include a rating option for quick feedback.
Ask users to rate their experience after completing a purchase.
Small Image
This layout allows you to show a small image alongside the notification text.
Share a product image with a quick update or offer.
Progress Bar
This layout allows you to display a bar indicating progress toward a goal.
Inform users of their progress in a download or achievement.
Multi icon
This layout allows you to display multiple icons within a single notification to represent different actions or categories.
Show multiple options or features at a glance.
Quick reply
This layout enables users to respond instantly from the notification using predefined reply options.
Let users respond quickly without opening the app.
Product set
This layout allows you to showcase a set of products within a single notification, each with its own image and action.
Highlight multiple products in a single notification.
📘
Using Timer and Progress Bar in Journeys
Ensure to follow these points while using Timer and Progress Bar layouts.
The journey end time must be less than or equal to the timer or progress bar end-time.
The timer can run for a maximum of 24 hours. If the journey exceeds this, users may receive expired timer notifications.
The TTL (Time To Live) must not exceed the timer or progress bar endtime. If it does, notifications may be delivered after the timer has expired, showing the timer end message to users.
When you create or select an Advanced layout, the Customize Your Template screen appears. Here, you can add and customize app push notification content. The left pane updates the mobile preview on the right, showing how it will appear to users.
Customize your App Push Template
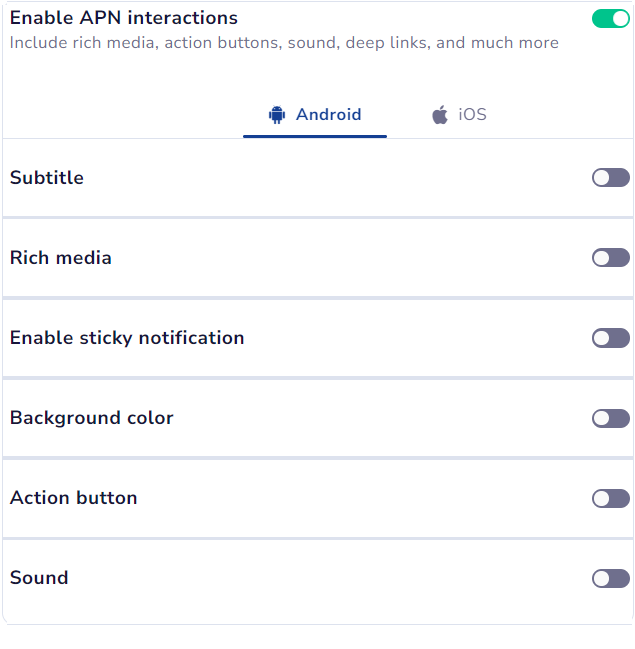
Toggle on Enable APN Interactions to include rich media elements, action buttons, sound, deep links, and more.
Enable APN Interactions to include rich media, sound, and so on
Refer to the table below to learn about all the options available to customize your app push template.
Upload File: Drag and drop the file or select it from your computer.
Media URL: Allows you to add an image URL.
📘 PNG and JPEG file formats are supported.
\
button. It cannot be removed by swiping or using the Clear All option in the notification tray.
Note: The notification can be dismissed if the user's device has Android 14 or later installed. For more details, refer to the official Android update.
Here are the requirements for setting a custom sound: true />
Refer to the table below to learn about all the options available to customize your app push template.
Options
Descriptions
Available for
**Title**
Allows you to add the title of your push notification. You can also add formatting such
📘 The sound file name must be in your app bundle. If it is missing, the device will play the default sound.
Overlay on image, Timer, Carousel (E2E), Edge to edge, Rating, Small image, Progress Bar
**Carousel Type**
This option allows you to select between **Manual** and **Automatic** carousel transitions. In **Automatic**, set the timer for image transitions between 2 and 10 seconds. 📘 Ensure the important part of the image is not in the lower portion. Users can add up to five images with a 2:1 aspect ratio and a maximum file size of 40KB.
Carousel (E2E)
**Text/Emoji**
Allows you to add words or emojis as rating options.
Rating
**Rating Scale**
Allows you to select the number of rating options to provide between two, three, or five.
Rating
**Timer Settings**
**Copy from iOS/Android**
Copy common content between Android and iOS while configuring your push notification. Refer [here](https://cedocs.netcorecloud.com/docs/create-app-push-copy-1#copy-from-iosandroid) to know more.
Timer
**Progress Bar Settings**
elect it from your computer. **Media URL**: Allows you to add an image URL. 📘 PNG and JPEG file formats are supported. URL must include an HTTPS protocol ending with a supported file format. Example: [https://website.com/image.png](https://website.com/image.png)
Overlay on image, Timer, Carousel (E2E), Edge to edge, Rating, Small image, Progress Bar
Progress Bar
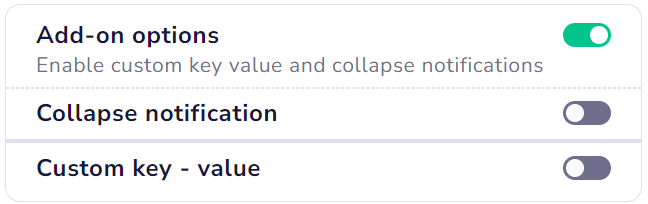
Toggle on Add-on options to enable custom key value and collapse notifications.
Enable custom key value and collapse notifications
- Collapse Notification
This feature is used by FCM (Firebase Cloud Messaging) and APNS (Apple Push Notification Service) to update older notifications that have already been delivered. When multiple notifications share the same collapse key, only the most recent one will appear in the user's notification tray. For example, if you send a series of cricket match score updates, you can set score_updates as the collapse key. This ensures that only the latest score update is visible in the user's notification tray.
- Custom Key-Value Pairs
In this section, you can define custom key-value pairs specific to the operating system. These pairs trigger actions within the app when a user interacts with a notification, enabling personalized experiences. For example, a shopping app can use a key-value pair like Key: category and Value: shoes to direct users to the shoes section when they click a notification about a shoe sale.
📘
Note
At least one operating system must be selected.
You can add up to 49 key-value pairs
Copy From iOS/Android
To make App Push creation faster and more flexible, you have the option to copy common content between Android and iOS while configuring your push notification. This enhancement removes dependency to manually duplicate the same content across platforms.
👍
Important Points to Remember
Choose both an Android and an iOS app while setting up campaign to enable Copy from Android/iOS option.
When copying content between platforms, only field values are copied. Field enablement or disablement is not synced. For exampIe, if a field is disabled on Android but enabled on iOS, it will remain enabled on iOS after using Copy from Android.
Steps to enable copy to iOS/Android
1. Configure content on one platform (Android or iOS).
2. Switch to the other platform tab.
3. Click Copy from Android or Copy from iOS and confirm the action in the modal.
Copying content overwrites common fields in the destination platform. Refer to the table below to understand which set of content can be copied:
Category
Fields
Common content fields
Title
Subtitle
Body message
Image / GIF URL
Background color
CTA text
CTA URL / action link
Carousel card fields
Card title
Card description
Card image URL
Card CTA
Refer to the table below to understand which set of content cannot be copied and has to be manually entered:
Category
Fields
Platform-specific settings
Android sound settings
Sticky notification (Android)
Collapsed state customization (Android)
Android add-on or advanced options
Any other platform-exclusive configurations
Send Test Notification
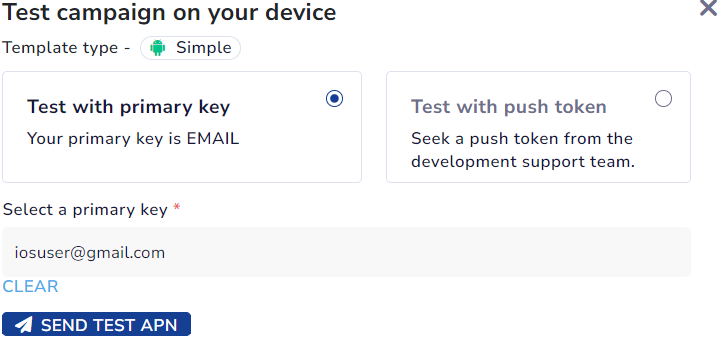
Select the Send Test Notification option to preview your app push before sending it to users. You can send a test push notification to users using either the push token ID or the primary key.
Send Test Notification to your device
Refer to the table below for details on the sections under Send Test Notification.
Field Name
Description
Test with Primary Key
Send the notification to a user identified by their primary key. This method helps test how the notification appears for that specific user.
Test with Push Token
Obtain a push token from your development support team to test notifications on a specific device. This allows you to verify delivery directly on the device.
📘
Note
Test notifications are excluded from campaign statistics.
Schedule
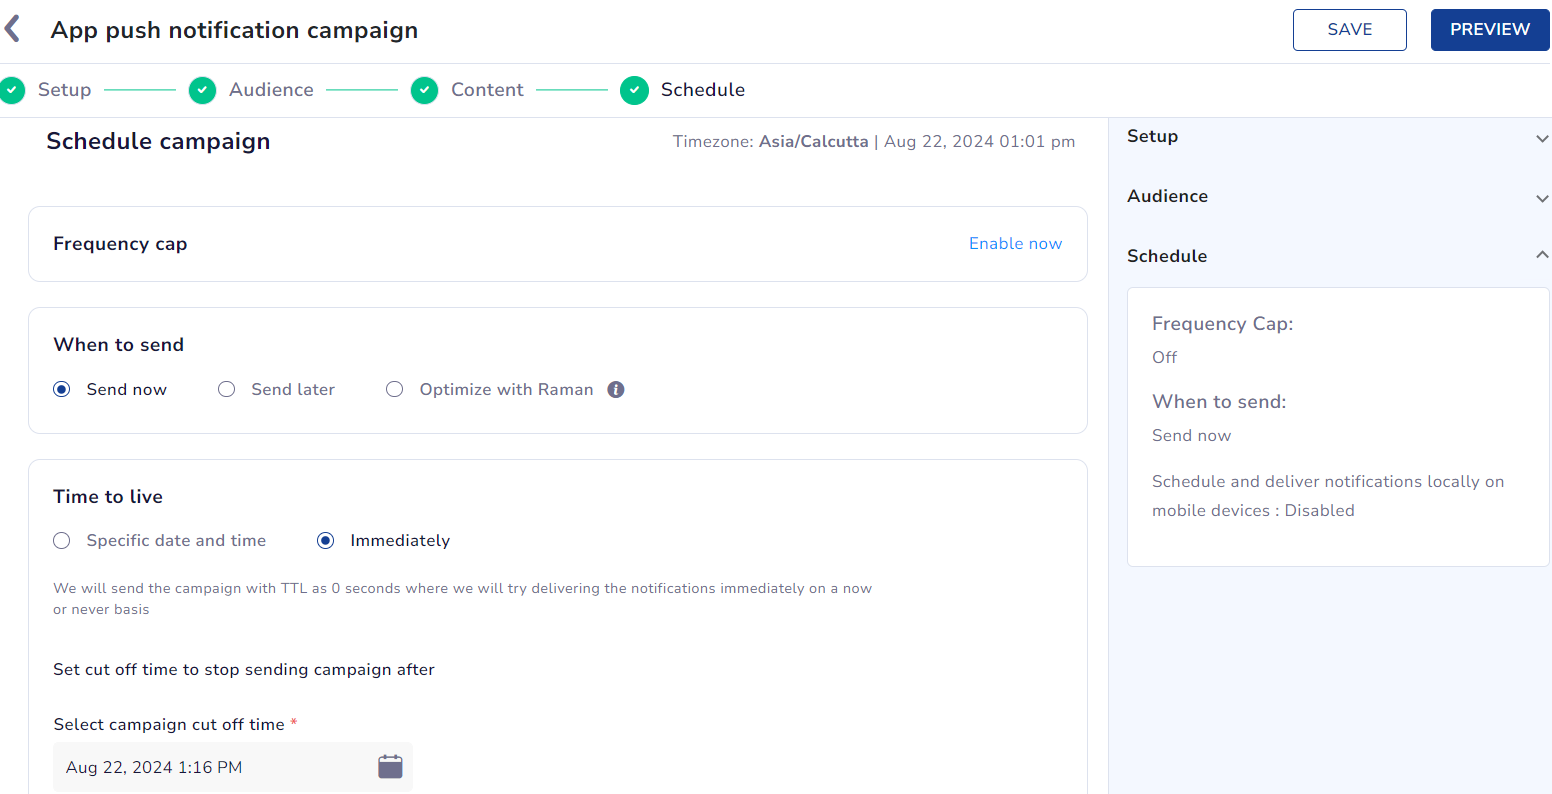
7. Define the campaign's delivery time and date under the Schedule section.
Schedule your App Push
Refer to the table below for details on the sections under Schedule campaign.
Option
Description
Frequency cap
Turn on the frequency cap to limit the app push notifications a specific user can receive. Refer to frequency capping to learn more about the setting.
When to send
Select the options for when you want your app push campaign to be sent. an App Push Notification" border=true />
Setup
<Accordion title="4. Add the campaign details here.">
Refer to the table below for details on the sections available under Setup.
| Sections | Description
Time to Live (TTL)
TTL determines how long FCM will store and try to deliver your notification. ------------------------------------------------------------------------------------------------------------------------------------ |
| Campaign Name | Enter a unique name for this app push campaign.
Maximum length: 255 characters
Allowed characters: alphanum
Schedule and deliver notifications locally on mobile devices
Select this option to schedule push notifications directly on users' devices. When enabled, it ensures notifications are sent to almost 100% of your active users. Active users are those who come online from the time an app push campaign is scheduled until it is set to display on their device. Notifications can be delivered through FCM and Push Amplification if the user comes online during the scheduled period.
Points to remember: ience
<Accordion title=" 5. Define the target audience for your campaign in the Audience section.">
The Audience section lets you select who to target your App Push. It has the following sections:
Target Audience
Choose a specific segment or list to define the a
App Inbox
Send a copy of the push notification to the App Inbox. This ensures that users who miss a notification can access it later in the notification section of the app. 4f-TargetAudience.png" alt="Select your target audience for the campaign" align="center" width="80% " caption="Select your target audience for the campaign" border=true />
Target Audience has the following options:
All Contacts: Target all use
📘
Important
Running two consecutive campaigns within 30 minutes, the time frame could bypass the frequency cap check due to data synchronization delay.
For example, if you schedule one app push at 12:00 pm and another at 12:30 pm with a frequency cap limiting users to one app push per day. In this case, the second push notification may not reach users due to the frequency cap settings.
8. Click the Preview option to save your campaign and preview the app push. Once you have checked the details and appearance of your entire app push, click Save & Publish to publish it.



)