
MCP Server and Connectors
Learn how to connect the Netcore CE MCP Server with ChatGPT, Claude, and Cursor using OAuth authentication.
Overview
Most marketers spend a fair amount of time clicking through reports, exporting CSVs, and stitching numbers together to answer simple questions. The MCP server skips that step.
- Ask in plain English. No filters to set, no date pickers, no API documentation to read.
- Get answers in seconds. "What was the CTR on last week's welcome email?" returns a number, not a five-step navigation path.
- Cross-campaign comparisons get easier. The assistant can pull stats for several campaigns at once and put them side by side.
- Diagnosing problems is faster. Instead of opening the funnel report manually, you can ask why delivery dropped and get a useful starting point.
- The creative is one prompt away. Pull up the HTML, push payload, or template body without hunting for the campaign in the dashboard.
It's a layer on top of the same Netcore CE data you already have.
Environment URL
| Environment | URL |
|---|---|
| PROD | https://cee-mcp.netcorecloud.com/mcp |
Access from Netcore Panel
Before any AI client (ChatGPT, Cursor, or Claude) can connect, MCP must be enabled for the workspace from the Netcore panel.
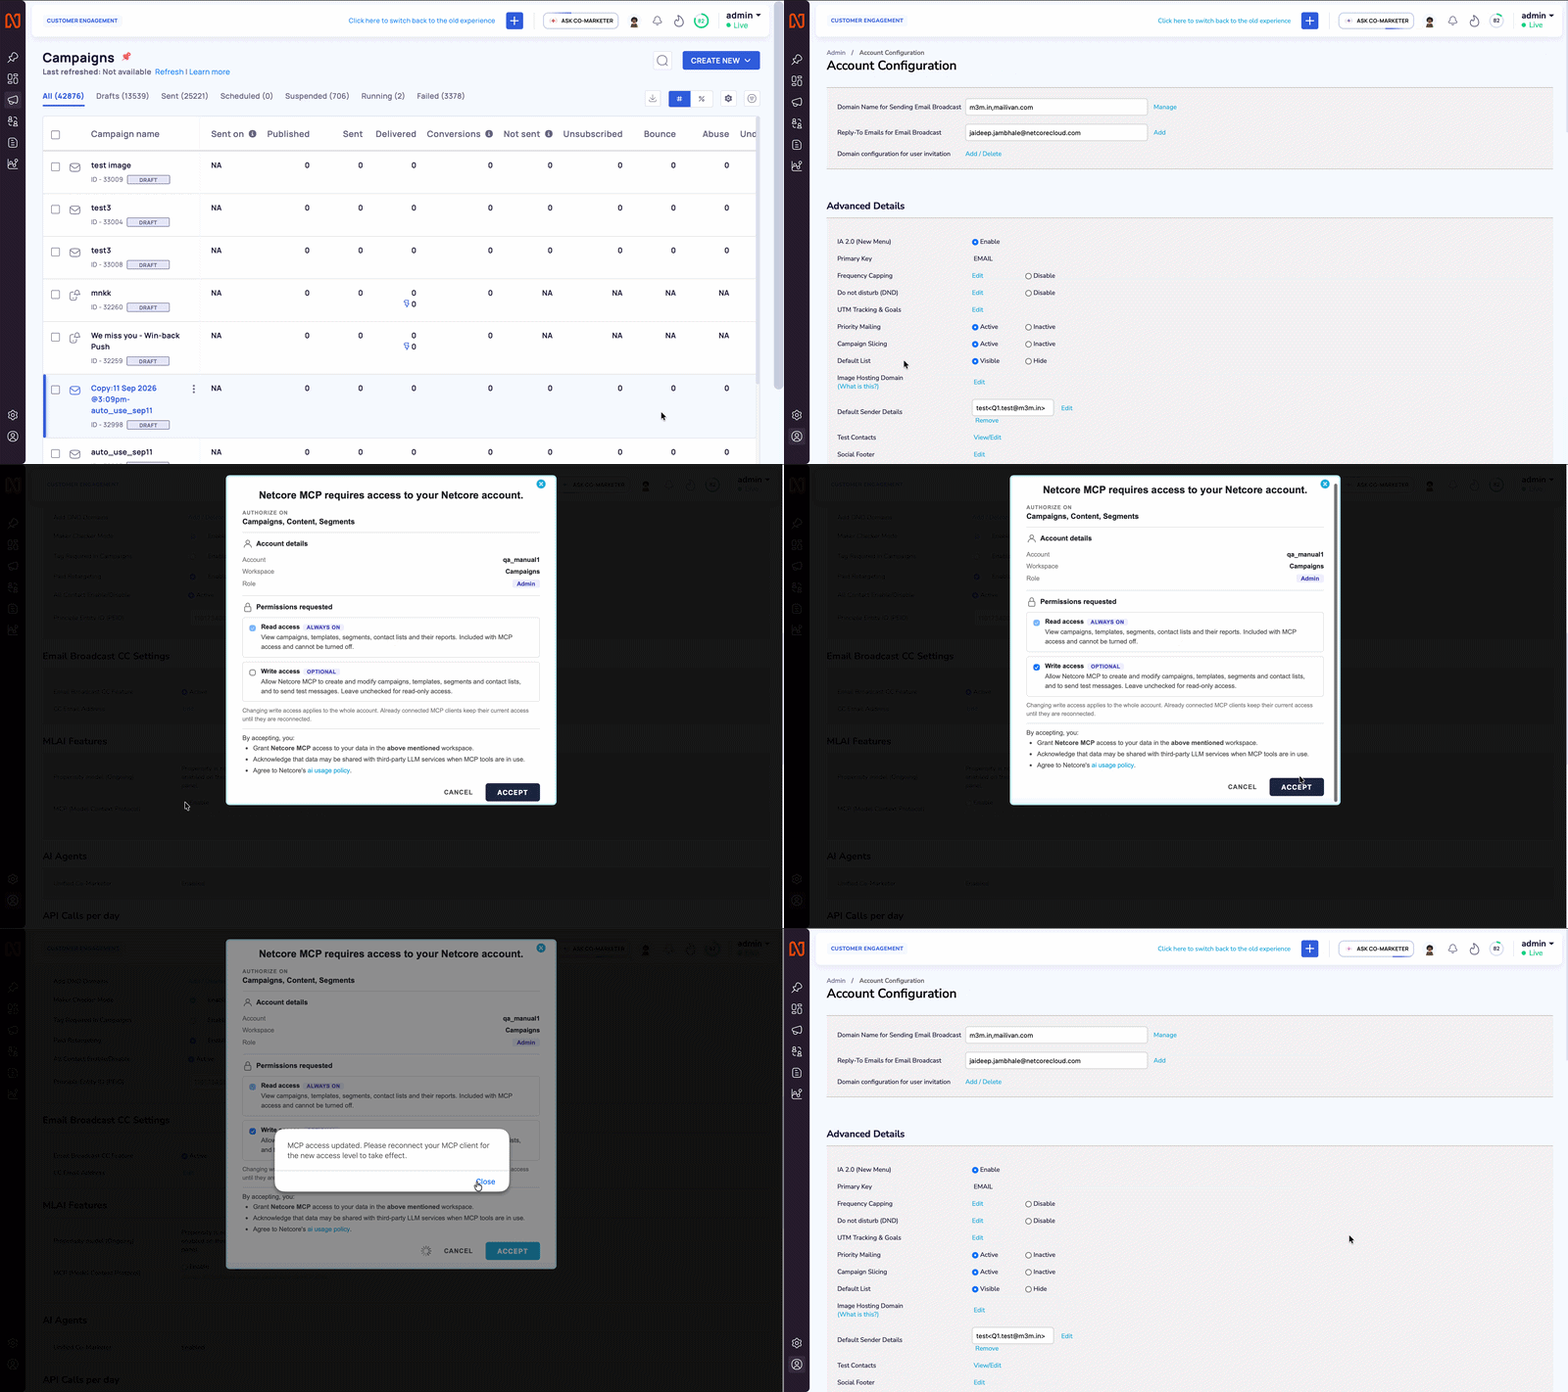
Configure MCP Server from Netcore Account
- Log in to the Netcore CE panel and navigate to Account configuration.
- Scroll to MLAI Features and enable MCP (Model Context Protocol).
- The Manage Netcore MCP access to your Netcore account dialog opens.
- Under Account details, confirm the account, workspace, and role that access is granted on.
- Under Permissions requested, choose the access level for the account.
- Review the acknowledgements listed at the bottom of the dialog.
- Review and select Save to grant access, or Cancel to back out without enabling MCP.
Important Point to RememberThe enablement flow on the MLAI section of the account configuration page can only be done by a user who has Admin access from the client's end.
Account Details
The dialog header shows Authorize on, which lists the modules MCP can reach: Campaigns, Content, and Segments.
| Field | What it shows |
|---|---|
| Account | The Netcore CE account MCP is being enabled on |
| Workspace | The workspace access is granted on |
| Role | Your role in that workspace, for example Admin |
Choose an Access Level
| Permission | Status | What it allows |
|---|---|---|
| Read access | Always on | View campaigns, templates, segments, contact lists, and their reports. Included with MCP access and cannot be turned off. |
| Write access | Optional | Allow Netcore MCP to create and modify campaigns, templates, segments, and contact lists, and to send test messages. Leave it cleared for read-only access. |
Write access applies to the whole accountTurning write access on or off changes it for every user on the account, not only for you.
MCP clients that are already connected keep the access they were given until they are reconnected. After you change this setting, ask your users to reconnect the Netcore CE connector in their AI client so the new permission takes effect.
When you select Save, you:
- Grant Netcore MCP access to your data in the workspace named in the dialog.
- Acknowledge that data may be shared with third-party LLM services when MCP tools are in use.
- Agree to Netcore's AI usage policy.
Understand MCP Flow
MCP is an open standard that lets AI assistants connect to external tools and services. Instead of opening the dashboard or writing API calls, you describe the outcome in plain English. Your AI assistant picks the right tool, and the MCP server handles authentication, the API request, and the response.
Channels Supported
| Channel | Searchable | Analytics |
|---|---|---|
| Yes | Yes | |
| App Push | Yes | Yes |
| Web Push | No | No |
| SMS | Yes | Yes |
| Yes | Yes |
App Push is the only channel that can be created or edited through MCP. Every other channel is available for search and analytics only. For the full tool list, see Available Tools.
Note
- All analytics tools enforce a maximum date range of 30 days per request.
- Supported status filters: Draft, Scheduled, Running, Paused, Completed, Suspended, Archived.
Authentication
The Netcore CE MCP server uses OAuth-based authentication tied to your Netcore CE account.
When you connect for the first time, you are redirected to authenticate with your Netcore CE credentials. If you are already logged into Netcore CE, you see an authorisation prompt requesting permission to access your workspace data.
The authorisation screen displays:
- Account: Netcore CE email.
- Workspace: The workspace you are currently logged into
- Role: It describes the role in the current workspace, for example, Admin, Manager, or Analyst
- Data Centre: Your data centre environment
- Permissions requested: The scopes the MCP server requires, for example
Campaigns:read
Click Accept to grant access.
Key Authentication Behaviours
- The MCP server inherits the environment, workspace, and role of your current Netcore CE session.
- Authentication tokens are derived from your active Netcore CE session.
- If you log out or switch workspaces in Netcore CE, you are prompted to re-authenticate the MCP connection.
- All data access respects your existing Netcore CE role-based permissions (RBAC).
UI Setup
Connect the Netcore CE MCP server to your preferred AI assistant. All three clients use the same OAuth sign-in, you authenticate once with your Netcore CE credentials, and the assistant takes it from there.
MCP Server URL
https://cee-mcp.netcorecloud.com/mcpConnect with Claude
Pro / Max users
- Open Claude and navigate to Settings > Connectors.
- Click + Add custom connector.
- Select Web Remote MCP as the connector type.
- Enter the MCP server URL from here.
- Click Add to save the connector.
- Click Connect and complete sign-in on the Netcore login page in your browser.
- Return to Claude and confirm the connector is enabled.
- You can then set Tool permissions for each tool: Automatic, Ask first, or Disabled.
Team Enterprise Users/ Enterprise Users
- Navigate to Organization Settings > Connectors.
- Adds the custom connector URL for the workspace.
- Each user has to navigate to Settings > Connectors and clicks Connect for the Netcore CE connector to complete their individual sign-in.
Once connected, you can start asking Claude questions like:
- "Show me all running email campaigns."
- "What is the delivery rate for my last app push campaign?"
- "Compare click performance across my SMS campaigns from last week."
Connect with ChatGPT
-
Go to chatgpt.com and sign in.
-
Open Settings and navigate to Apps & Connectors. Depending on your rollout, this may appear as Connectors.
-
If your workspace requires it, enable Developer Mode under Advanced Settings and click Create (or Add app / Add connector). Enter the connector details:
Name:
Netcore CE MCP(or any label you prefer)Connector URL: the MCP server URL from the Environment URLs table above
-
Click Save to create the connector.
-
Click Connect and complete sign-in on the Netcore login page in your browser.
-
Return to ChatGPT and confirm the app shows as Connected with the Netcore CE tools visible.
Once connected, you can start asking ChatGPT questions like:
- "Search for all completed email campaigns with 'Welcome' in the name."
- "Get detailed stats for campaign ID abc123 for the last 7 days."
- "Show me which devices performed best for my latest app push campaign."
Connect with Cursor
- Open Cursor and go to Cursor Settings.
- Navigate to Tools & MCP.
- Click Add new MCP server.
- Choose Streamable HTTP (remote server) as the transport type.
- Enter the MCP server URL from the Environment URLs table above.
- Click Install / Save.
- When Cursor prompts for authentication, click Connect.
- Complete sign-in on the Netcore login page in your browser and return to Cursor.
- Verify from the MCP settings that the server is healthy and the tools are listed.
Configuration Example
For MCP-compatible AI agents that use a JSON configuration file (such as Claude Desktop or Cursor), use the snippet below.
{
  "mcpServers": {
    "netcore-ce": {
      "type": "streamableHttp",
      "url": "https://mcp.netcorecloud.com"
    }
  }
}
Authentication is handled via the OAuth redirect described above. Credentials are never passed as headers in your local configuration.
Transport Options
| Transport | Status | Description |
|---|---|---|
| Streamable HTTP | Available (default) | Standard HTTP transport supported by all MCP-compatible clients. |
| STDIO Transport Bridge | Available | Contact your account manager or the Netcore helpdesk to enable. |
Agent Permission and Access Control
When managing AI agent permissions, apply stricter controls for any task that affects production data or sends outbound communication. Although the Netcore CE MCP server is read-only today, the principle still applies as new tools are added over time.
The risks of granting permanent, unrestricted permissions to an AI agent include:
- Exposing campaign-level data without human oversight during unexpected behaviour or prompt injection attempts.
- Bypassing approval workflows that protect compliance and brand standards.
- Generating noisy, irrelevant queries that consume API quota.
Refer to the MCP implementation guidelines for more details.
Best practiceConfigure agent permissions following the principle of least privilege. Grant only the minimum access necessary for the specific task, for the shortest duration required.
Built-in Safety Controls
The Netcore CE MCP server includes several controls to reduce operational risk:
- Read-only scope: The server cannot create, modify, or delete campaigns, segments, or templates.
- Session-scoped credentials: Credentials are derived from your active Netcore CE session and are never exposed in model-visible content.
- Input validation: Runs before every upstream API call. Missing or malformed parameters return a guided error rather than a silent failure.
- HTTPS and timeouts: Protect all upstream communication.
- Rate limiting: Configurable per workspace.
Security and Permissions
- The MCP server provides read-only access to your campaign data. It cannot create, modify, or delete campaigns.
- All data access is scoped to the workspace and role of the authenticated user.
- Data shared with AI assistants is subject to the respective AI provider's data-handling policies.
- Review Netcore's Privacy Policy and Data Security pages for more information.
Limitations
- Date range: Analytics queries are limited to a maximum of 30 days per request.
- Batch size:
get_campaign_listsupports up to 200 campaign IDs per request. - Content size: Email HTML content can be large (10–50 KB). Use
get_campaign_contentonly when you need to analyse the actual creative. - Channel availability: The MCP server only returns data for channels enabled on your workspace. Contact the Netcore helpdesk to enable additional channels.
Risk Information
- Connecting an MCP client (ChatGPT, Cursor, Claude, or any other MCP-compatible agent) to the CEE MCP server is a user-elected configuration. Users are responsible for evaluating the security and suitability of any MCP integration before connecting it to a production workspace.
- Netcore is NOT responsible for issues arising from misconfiguration, misuse, third-party client vulnerabilities, or unintended actions performed through MCP-enabled workflows.
- To reduce risk, point new integrations at STG1 or QA first and validate the tool outputs before connecting to PROD. It is advised to review all MCP-initiated actions and responses before taking any action.
Updated 24 days ago