
Custom Unsubscribe Page
Design Custom Unsubscribe Page that subscribers see when they opt out of your email communications.
Overview
The Custom Unsubscribe Page lets you design the page subscribers see when they opt out of your email communications. Instead of showing a generic system page, build a branded experience using the same drag-and-drop editor that you use for your email templates. We let you control the text, colors, images, and the reasons subscribers can select when they leave your list.
Manage unsubscribe pages from Settings > Unsubscribe pages. Create multiple pages, edit them anytime, and select which one acts as the default for your account.
What's new
- You can create multiple unsubscribe pages and switch the default at any time.
- Every unsubscribe page gets its own unique, shareable URL.
- You can preview your page on desktop, tablet, and mobile before you publish it.
- To use your default unsubscribe page inside an email template, place the tag
[UNSUBSCRIBEURL]on the unsubscribe keyword or link in your creative. At send time, this tag is replaced with the URL of your default unsubscribe page. - Unsubscribe reason labels support multiple languages, so you can localize the wording shown to subscribers.
Benefits
- On-brand experience: Add your logo, brand colors, and your own messaging so the unsubscribe page feels consistent with the rest of your emails.
- Better feedback: Capture the actual reason a subscriber unsubscribes, so your team understands why people leave.
- Flexible setup: Build different pages for different campaigns or brands, and keep one as your account default.
Prerequisites
- You need access to Settings in your Netcore CE account.
- Your role or profile must have permission to create and edit Unsubscribe pages under Settings.
- This feature works only for the Email channel. It does not apply to SMS, WhatsApp, or other channels.
Step-by-step navigation
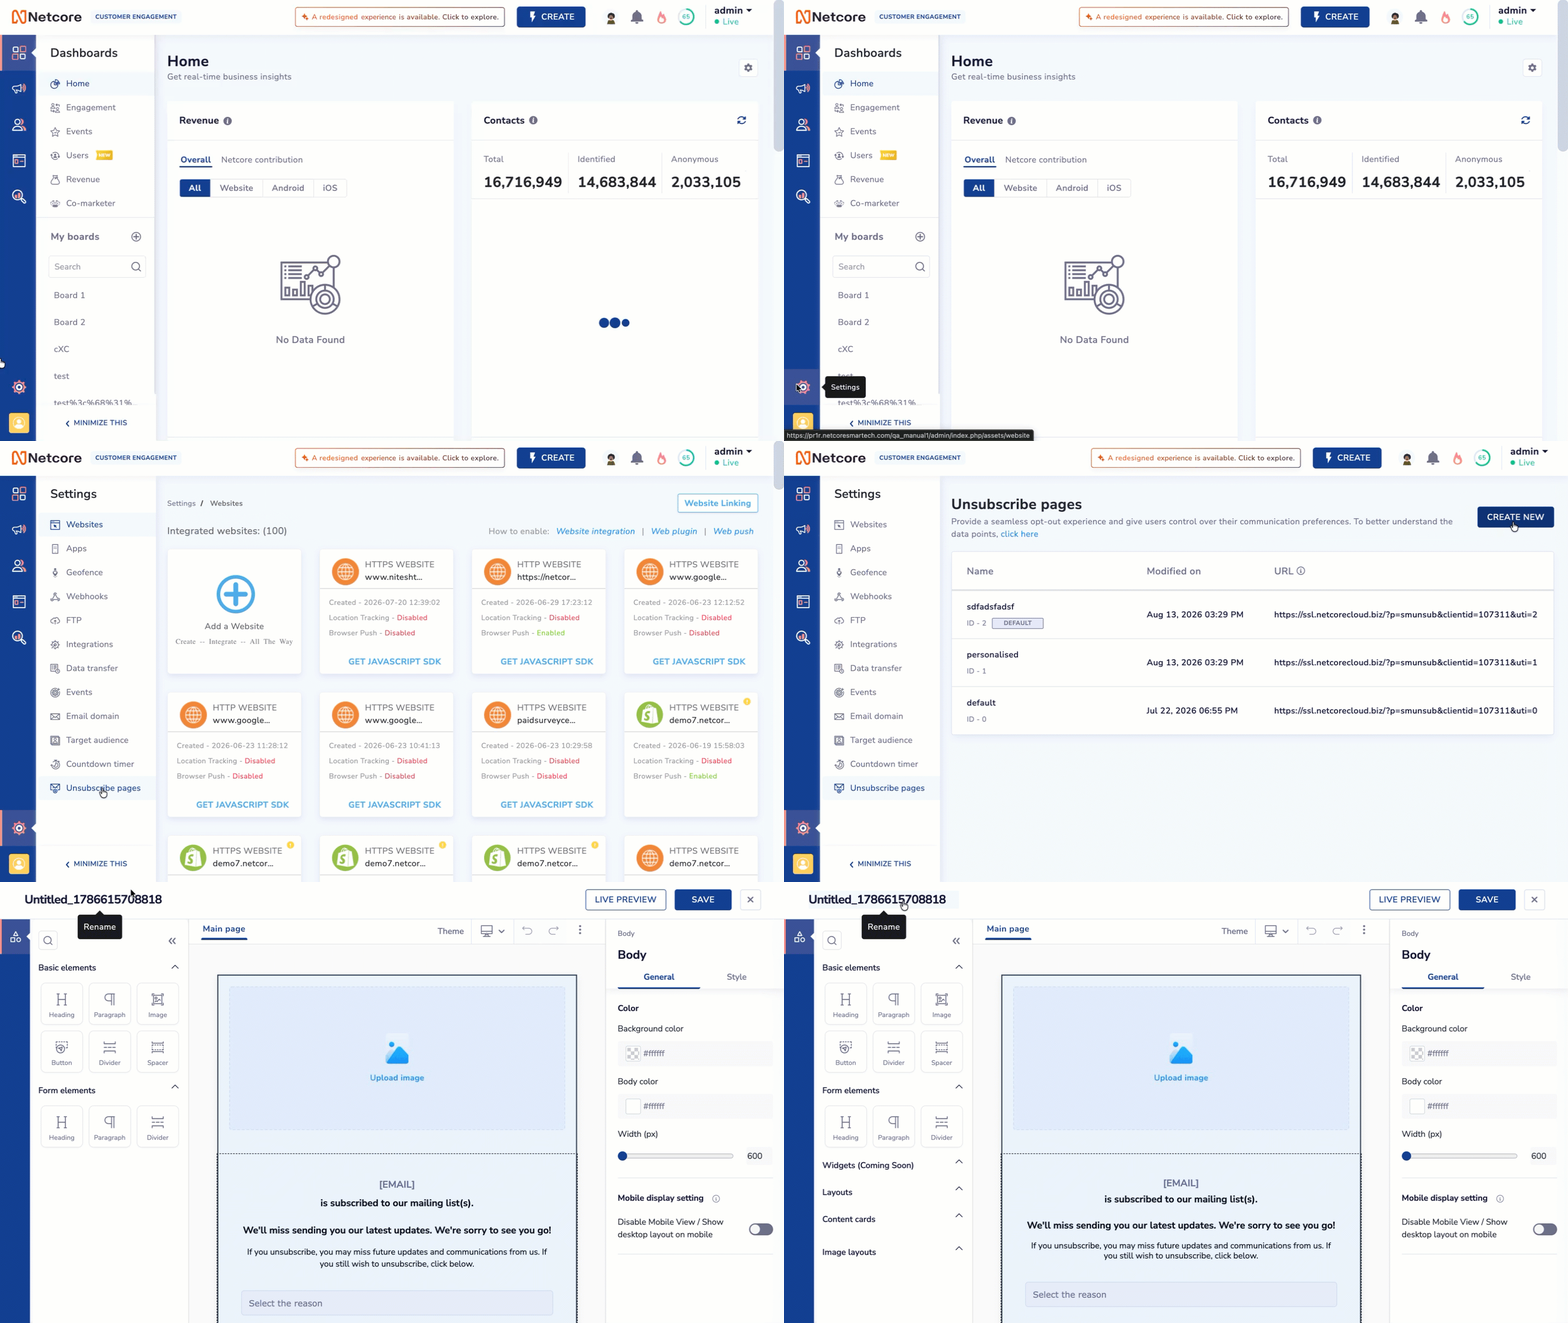
Create New Unsubscribe Page
Follow the steps given below to create a customized unsubscribe page.
- Log in to your Netcore CE account.
- Click Settings, then click Unsubscribe pages.
You land on the Unsubscribe pages list. This page shows every unsubscribe page you have created, along with its name, the date it was last modified, and its unique URL. The page marked DEFAULT is the one the system uses automatically when a campaign does not specify another page.
-
On the Unsubscribe pages list, click CREATE NEW in the top right corner.
-
The editor opens with a ready-made template that already includes a heading, a message, a reason dropdown, and an Unsubscribe button.
-
Give your page a clear, descriptive name so you can find it easily later.
-
Customize the unsubscribe reasons: Click the reason Dropdown field on the canvas. The dropdown already includes common reasons.
-
Click any reason text directly on the canvas to rename it to match your own wording. This wording supports multiple languages, so you can localize the reason labels for different audiences.
ImportantYou can change the text of the dropdown options, but you cannot increase or decrease the number of options. The dropdown always has 6 options by default.
- Set up the confirmation step
If you click on the Form block, you see two tabs: STEP 1 and SUCCESS.
- STEP 1 is the page subscribers see first, where they confirm they want to unsubscribe and pick a reason.
- SUCCESS is the page subscribers see after they confirm. Click this tab to edit the confirmation message shown after a successful unsubscribe.
-
Preview your page: Click LIVE PREVIEW at the top right of the editor. Use the device icons in the top right corner to switch between desktop, tablet, and mobile views.
-
Click SAVE at the top of the editor once you are happy with the design.
- Click SAVE & EXIT to keep your changes.
- Click DISCARD TEMPLATE to exit without saving.
After you save, your page appears in the Unsubscribe pages list with its own unique URL.
ImportantIf you edit an unsubscribe page that is already live (already shared or already set as default), your changes go live on that same URL in real time as soon as you save. Subscribers who open that link after your save see the updated page. You do not need to publish or share a new link for the change to take effect.
- From the Unsubscribe pages list, locate the page you want to use as your account default.
- Hover over the row for that page. A three-dot (kebab) menu appears on the right.
- Click the three-dot menu and select Set as default. Only one page can hold this status at a time. Setting a new default automatically removes the previous page's default status.
- The default page is the one that gets used for the
[UNSUBSCRIBEURL]tag going forward.
ImportantChanging the default page applies only to new sends going forward. Campaigns you have already sent, or emails already queued, continue to point to whichever page was the default at the time they were sent, and are not updated retroactively.
Using multiple unsubscribe pages
If you have created more than one unsubscribe page, you have two ways to control which one a given campaign uses:
- Switch the default: Set the page you want to use as the account default (see step 12 above). Any campaign that relies on the
[UNSUBSCRIBEURL]tag then automatically uses this page. - Use a specific page without changing the default: Copy the unique URL of the page you want to use from the Unsubscribe pages list, and manually paste it in place of the unsubscribe link in that campaign's creative. This lets you point one specific campaign to a non-default page without affecting any other campaign.
Good to know
- Only the Email channel supports custom unsubscribe pages.
- To apply your unsubscribe page inside a campaign, add the
[UNSUBSCRIBEURL]tag on the unsubscribe keyword or link in your email HTML. This tag is replaced with your default unsubscribe page's URL at send time. - Every subscriber who unsubscribes is automatically blacklisted, and their selected reason is stored for reporting.
- Netcore CE tracks unsubscribe link clicks, successful unsubscribes, and selected reasons, so you can review this data in your reporting and analytics.
Updated about 2 hours ago