
Dynamic Wait Condition in Journeys
Dynamic Wait lets a Journey hold each user until a set time.
Overview
This document covers the new Wait step for Journeys. Use it to hold a user at a point in the Journey for a fixed period, or until a specific time relative to one of their own event attributes.
Use cases by industry
Conditional wait works well for appointments, since every user's appointment time is different. Here are a few everyday examples.
| Industry | Everyday appointment | Example wait setup |
|---|---|---|
| BFSI | A customer books a video KYC call with the bank. | Wait until 30 minutes before the KYC slot attribute, then send a reminder with the call link. |
| E-commerce | A customer picks a home delivery slot for a large order. | Wait until 1 hour before the delivery slot attribute, then send the delivery agent's ETA. |
| Travel | A traveler books a flight with a set check-in window. | Wait until 3 hours before the check-in-opens attribute, then send a push notification to check in online. |
| Edtech | A student enrolls in a live class. | Wait until 15 minutes before the class start attribute, then send a reminder with the class link. |
Where to find it
Add a Wait step, the clock icon, at any point in your Journey canvas. Place it right after a Yes/No branch or any other step. Click the Wait step to open Configure Wait.
Configure a Wait Node
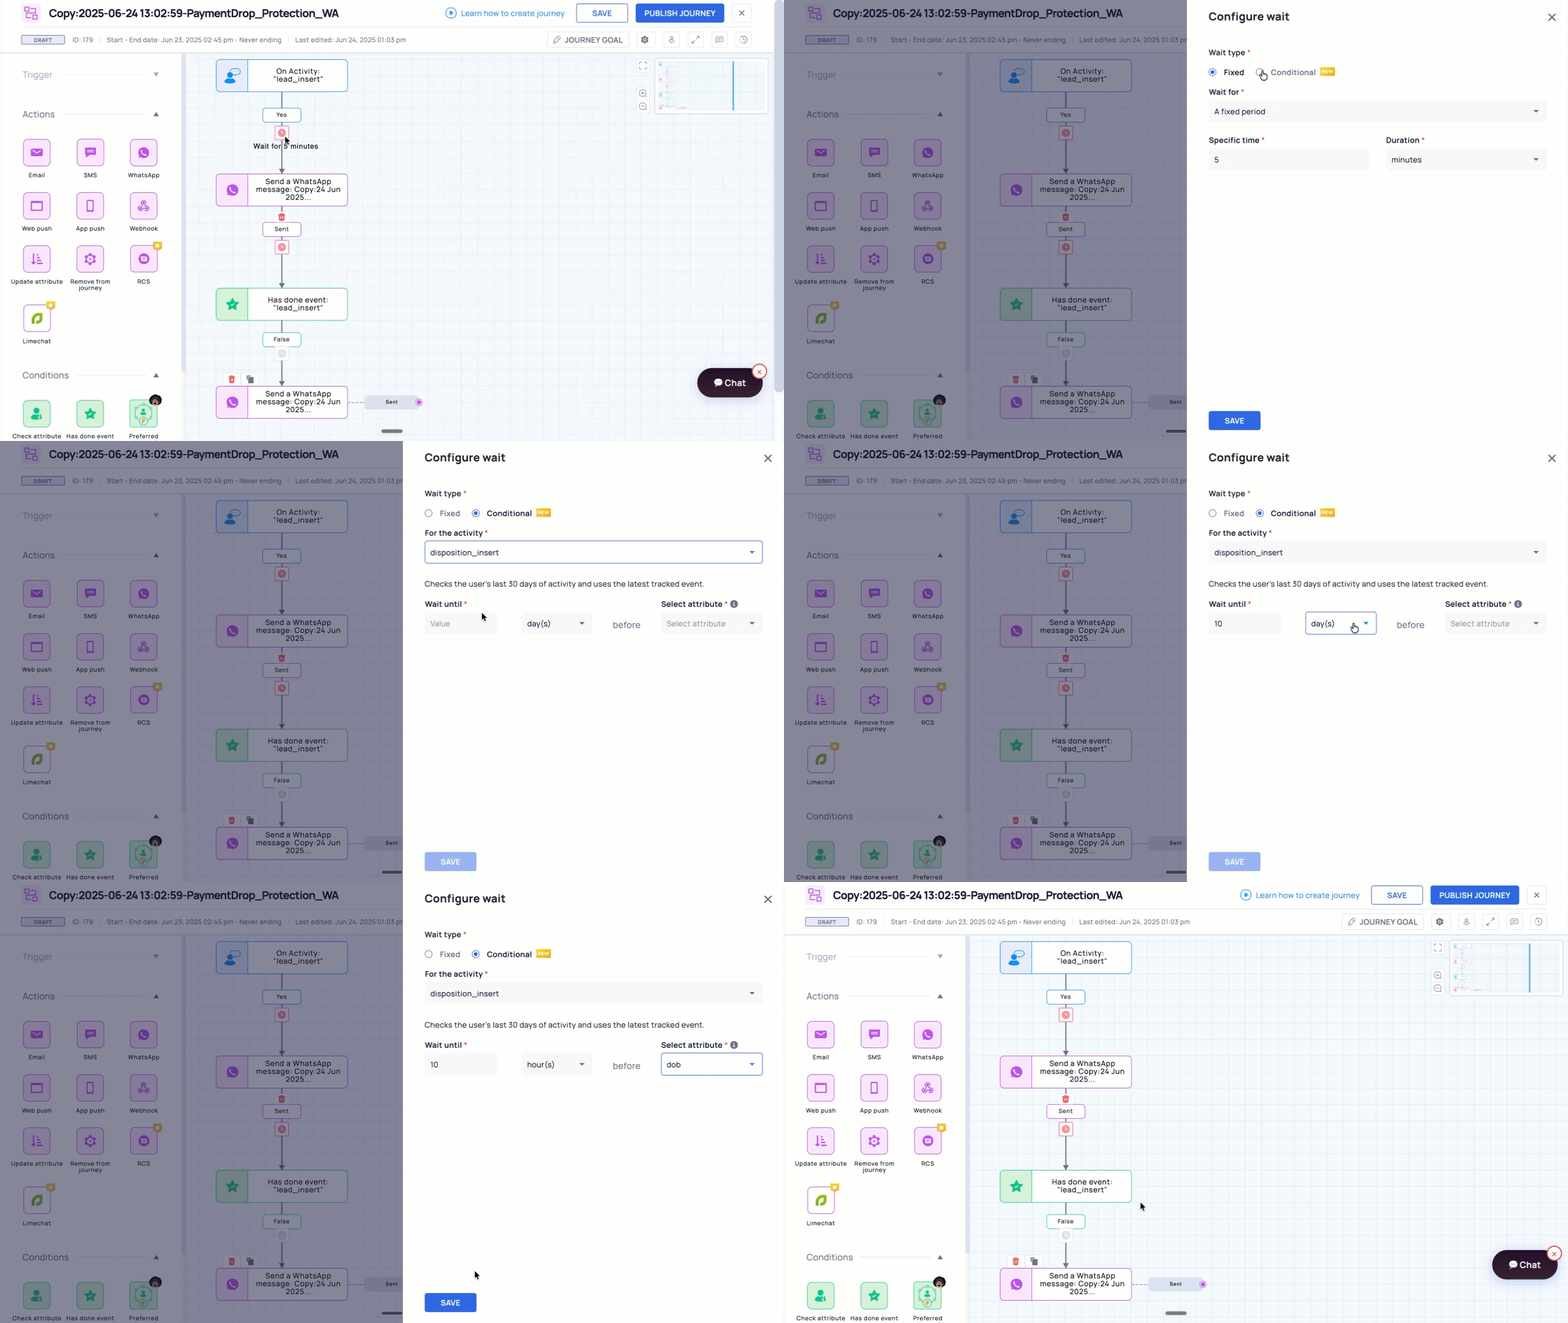
Add Dynamic Wait Condition in Journeys
Follow the steps given below to configure a wait node.
Step 1: Choose your wait type
Under Wait type, select one:
- Fixed: wait for a set amount of time. Every user waits the same length of time.
- Conditional: wait until a specific point relative to one of the user's own event attributes. Each user can wait a different amount of time.
Step 2a: Set a fixed wait
If you chose Fixed:
- Set Wait for to A fixed period.
- Enter a Specific time (a number).
- Choose the Duration unit.
Step 2b: Set a conditional wait
If you chose Conditional:
- Under For the activity, select the event to check. A note under this field confirms: the system checks the user's last 30 days of activity and uses the latest tracked event. This lookback period is fixed and isn't something you configure.
- Under Wait until, enter a number, choose a unit (day(s), hour(s), or minute(s)), then select the date-time attribute to count backward from.
- In the Select Attribute dropdown, only date/time payloads are visible.
Step 3: Save
Select Save, then continue building the rest of your Journey.
Example
An EdTech marketer wants to remind students 10 hours before their class.
- Add a Wait step after the trigger.
- Wait type: Conditional.
- For the activity: select the event that carries the class time, for example, disposition_insert.
- Wait until: 10, hour(s), before the class start attribute.
- Save, then continue the Journey to the reminder message.
The system checks the user's activity for that event over the last 30 days, finds the latest tracked instance, and holds each user until 10 hours before that attribute's value.
Important Things to Know
- Fixed wait works like a standard wait step: it holds every user for the same amount of time.
- Conditional wait is new. It's attribute-aware: each user waits a different real amount of time, based on their own event data.
- The system looks back over the user's last 30 days of activity to find the event to calculate from. This window is fixed and isn't something you set.
- Conditional wait counts backward from a date-time attribute on the selected event, so that attribute needs to store a real date and time for the wait to calculate correctly.
Updated about 5 hours ago