
Create A/B & Split Web Message Campaign
Learn how to create A/B and Split Web Message campaigns.
Overview
A/B Testing and Split Campaigns for Web Messages let you create and compare multiple message variants within a single campaign. By measuring performance across variants, you can identify the content that drives the best results and automatically show the winning message to the rest of your audience.
Campaign Types
When you create a new Web Message campaign, you can choose from the following campaign types:
| Campaign Type | Description | Winner declared? |
|---|---|---|
| Regular | A standard single-message campaign. | Not applicable |
| A/B Campaign | Configure multiple variants to check which delivers better results. Variants are tested on the full audience during a test window, and the best performer is declared the winner automatically. | Yes, automatically |
| Split Campaign | Configure multiple versions to identify the best performer. Variants run in parallel for the full campaign duration with an audience split that you control. | No |
Note
- Only templates built with UCE or Custom HTML can be used in A/B and Split campaigns. Templates without UCE or Custom HTML support, including BEE editor and Pseudo editor templates, are not listed.
- Once this feature is enabled, templates created using the BEE Editor and Pseudo Editor will no longer be supported across all campaign types including Regular campaigns as well.
- If you launch a campaign directly from the Saved Templates section, the campaign is created as a Regular Campaign by default.
Prerequisites
Ensure the following conditions are met before creating an A/B or Split Web Message campaign:
- Your Netcore CE account has Web Message enabled.
- Setting up a conversion goal is mandatory if you plan to use a control group, or if you want to use Conversions as the criterion for deciding the winner.
- The web message templates you intend to use are built with the Unified Content Editor (UCE) or Custom HTML. Templates built with the BEE editor or the Pseudo editor are not supported for Web Message campaigns, so you cannot create them, and you cannot select them from existing templates.
- You use a supported desktop browser and a screen width of at least 1280 px when creating a campaign.
Create an A/B or Split Web Message Campaign
Campaign creation follows a four-step process: Setup → Audience → Content → Schedule, followed by a Preview page where you review and publish.
Refer to the sections below for each page.
Step 1: Select the Campaign Type
- Navigate to Campaigns > On-Site messages > Web Message and click Create Campaign.
- Select Web Message as the channel.
- Under Campaign Type, choose one of the following:
- A/B Campaign: To run a test with automatic winner declaration.
- Split Campaign: To run a test with a fixed audience split and no automatic winner.
The campaign name header automatically displays an [A/B] or [Split] tag to identify the type.
- Configure the Conversion Goal (Optional but Recommended)
- Set the Control Group (Optional) & select the Audience.
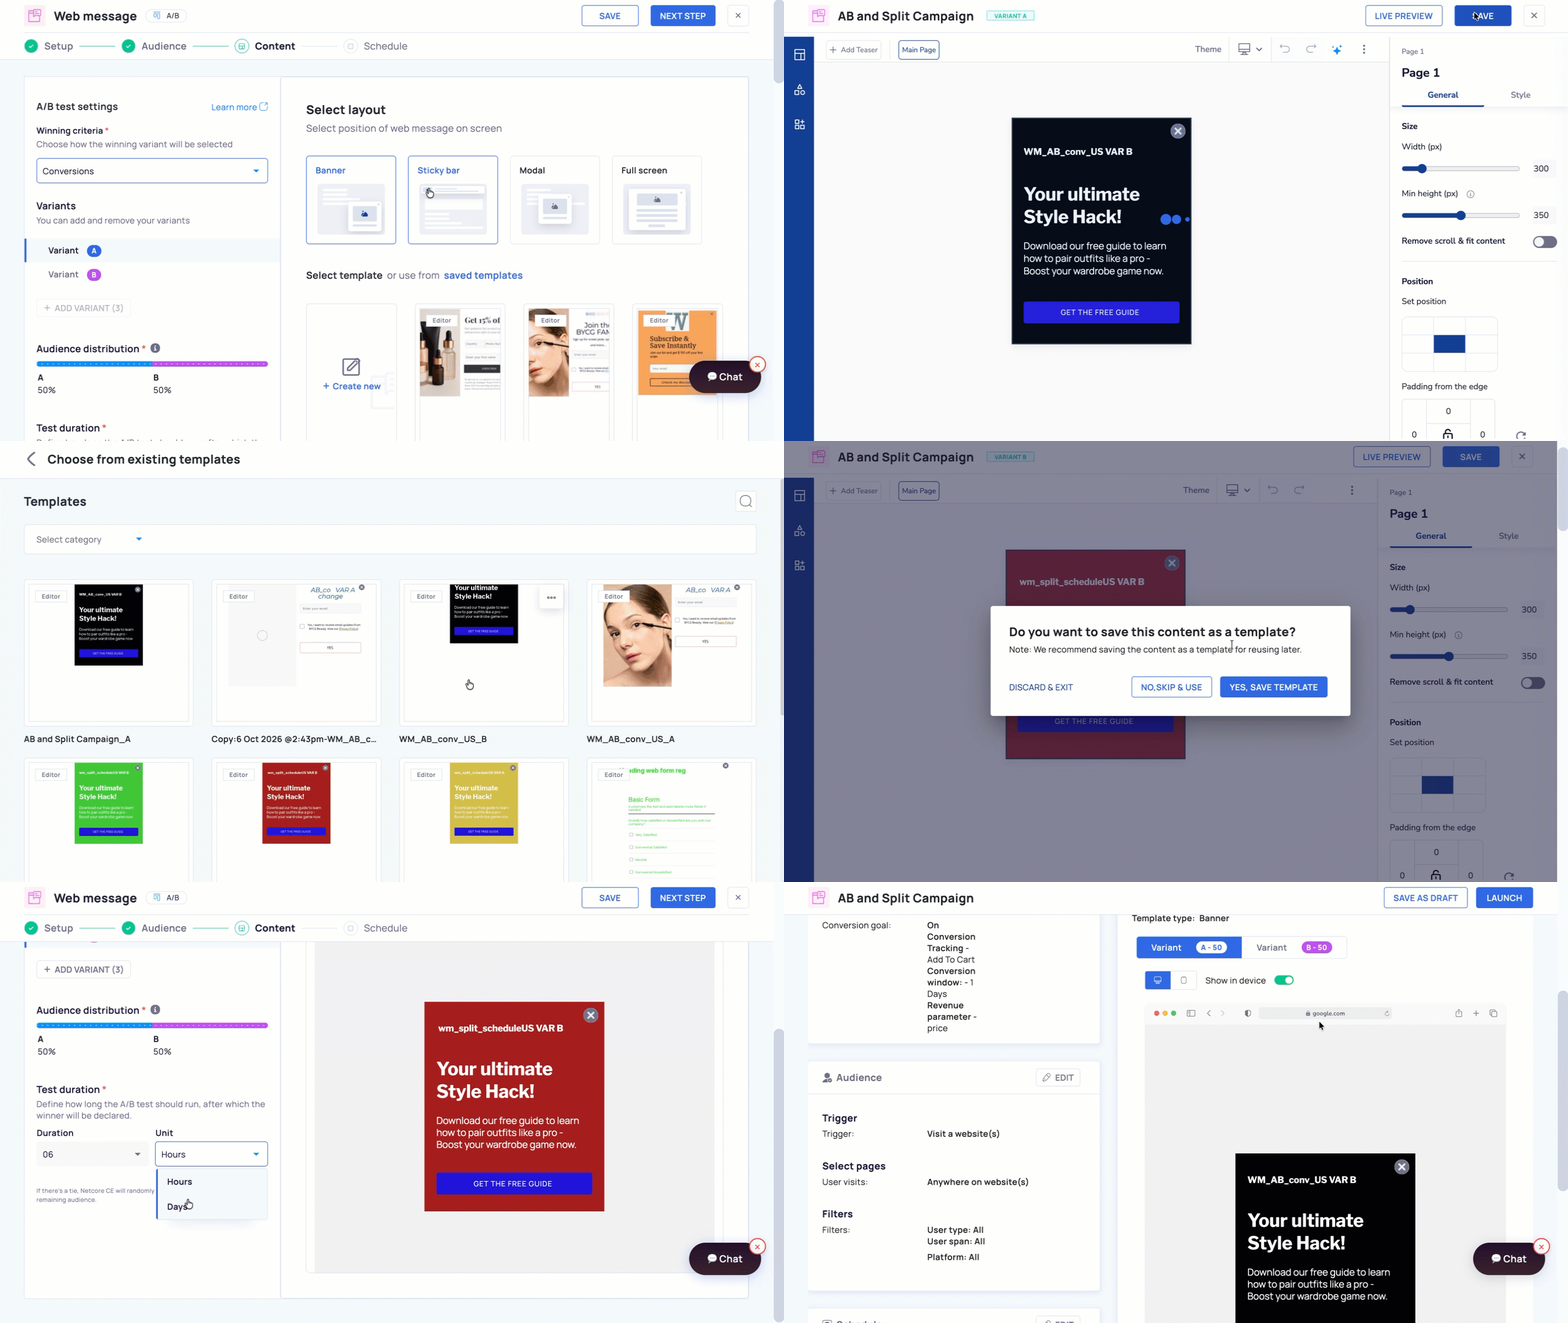
Create A/B & Split campaign in Web Message
Step 2: Content
The Content page is where you configure your message variants, set the winning criteria, define audience distribution, and set the test window. The page is divided into a left-hand configuration panel and a right-hand template panel.
A/B Configuration
Winning Criteria (A/B Campaign only)
Select the metric that determines the winning variant:
- Clicks: the variant with the highest click-through rate wins.
- Conversions: the variant with the highest conversion rate wins.
Note
- The Winning Criteria dropdown is not available for Split Campaigns. Split campaigns do not declare a winner.
- The Conversions option is always available in the dropdown. If you select it without configuring a Conversion Goal on the Setup page, the field shows the error "Please configure conversion goal in setup section". The error clears once you configure the Conversion Goal.
- Views are not offered as a winning criterion. All variants share the same trigger and audience criteria, so views cannot be optimized. A/B tests use down-the-funnel metrics such as clicks or conversions
Variants
Each campaign starts with two variants (Variant A and Variant B) by default. You can have a minimum of 2 and a maximum of 5 variants.
| Action | How to Perform It |
|---|---|
| Add a variant | Click + Add Variant. The button shows the number of remaining slots (for example, "+ Add Variant (3)"). It is hidden once you reach 5 variants. |
| Copy a variant | Hover over a variant card and click the Copy icon. The copy option is always visible on every variant. |
| Delete a variant | Hover over a variant card and click the Delete icon. The Delete icon is visible only when 3 or more variants exist. A minimum of 2 variants is required at all times. |
| Re-order after deletion | Variants renumber automatically. For example, deleting Variant A from [A, B, C, D] leaves three variants, and the former B, C and D become A, B and C. If you then delete the new Variant C, two variants remain (A and B). When only 2 variants remain, no Delete icon is shown. |
Variant Completion RuleYou must complete the template for the current variant, in UCE or Custom HTML, before moving to the next variant. If required content is missing and you click Next Step, or try to move to another variant, the platform shows an error that names the missing detail (for example, "Please enter {missing detail} to proceed"). Error messages appear in red and scroll you to the missing field automatically.
Tips Panel
A Tips section is displayed above the variant scroller to provide contextual guidance:
- Control Group tip: Shows the control group percentage that you set in the Setup step. It is not shown if no control group is set.
- Test window and winner declaration tip: Visible for A/B campaigns only. It is not shown for Split campaigns.
Audience Distribution
Controls what percentage of the campaign audience sees each variant.
| Campaign Type | Distribution Behaviour | Can You Adjust It? |
|---|---|---|
| A/B Campaign | Automatically divided equally among variants (for example, 50/50 for 2 variants; 33/33/34 for 3 variants; 20/20/20/20/20 for 5 variants). | No: The percentage slider is hidden. The entire audience takes part in the test window so that the winner is decided on a fair comparison. |
| Split Campaign | Initially divided equally, but fully adjustable using the audience percentage sliders around the variants. | Yes: Drag the sliders to set a custom distribution. All percentages must total 100%. |
Test Window (A/B Campaign only)
The test window is the period during which the platform collects data before declaring a winner.
- Default: 2 hours.
- Duration range: 1–23 hours, or 1–30 days.
- Unit: Hours or Days.
- In case of a tie at the end of the test window, the winner is selected at random by Netcore.
Template Selection
Use the right-hand panel to select or create the web message template for each variant. The template listing is the same Web Message gallery that you use for Regular campaigns.
| Option | Steps |
|---|---|
| Use an Existing Template | Browse the template listing. Click Use on the desired template. The template opens in its editor. Complete the template, then fill in the A/B testing configuration and proceed. |
| Create a New Template (UCE) | Select Editor (UCE). Design and save your template. You return to the Variant Content page, where a preview is shown. |
| Create a New Template (Custom HTML) | Select Custom HTML. The editor opens in full-screen mode. Create and save your template. You return to the Variant Content page, where a preview is shown. |
Editor behaviour
- When the UCE opens, the Variant Name (for example, Variant B) appears in the editor header so you always know which variant you are editing.
- The Custom HTML editor opens in a full-screen view, similar to UCE. The top navigation row (Setup → Audience → Content → Schedule) is hidden while you edit.
- The Custom HTML editor supports syntax highlighting and basic error detection for HTML, CSS and JavaScript.
Once a template is selected, the preview panel shows three action buttons:
- Change Template: swap the current template for a different one.
- Edit Template: open the template in the UCE or Custom HTML editor for modifications.
- Live Preview: view a rendered preview of the message.
Step 3: Schedule
Define the delivery time and date for the campaign. The same Schedule options apply to both A/B and Split campaigns.
- Set different timings for different days of the week. For example: Sunday 9 AM to 11 AM, Monday 12 PM to 3 PM.
- By default, all days are selected with a time window of 9:00 to 21:00.
- If you select multiple days, a Copy for all option is shown for the first selected day. It copies that day's timings to all the other selected days.
- If only one day is selected, the Copy for all option is not shown.
Step 4: Preview and Publish
The Preview page lets you review the full campaign configuration before publishing.
On the Preview page, you can see:
- Winning Criteria (A/B campaigns only): Clicks or Conversions.
- Test Window: The configured duration for the A/B test.
- Variant Previews: Toggle between Variant A, Variant B, and any additional variants to review each message design and content.
Review all details carefully. Once you publish the campaign, some configuration fields become locked.
NoteIf the campaign cannot be published, the platform shows the message "Campaign could not be published, please try again" and keeps you on the Preview page so that you can retry.
Campaign Listing Page
The campaign listing page provides an at-a-glance view of all your campaigns. A/B and Split campaigns have the following additional features.
Identifying A/B and Split Campaigns
- Each A/B campaign and Split campaign displays a unique icon in the listing to differentiate it from Regular campaigns.
- A downward arrow icon on a campaign row expands to reveal the individual variants.
- Note on Campaign IDs: The first variant (Variant A) shares the same Campaign ID as the parent campaign. Subsequent variants are assigned consecutive IDs.
Viewing Variants and Control Group
- Expand a campaign row to see all variants listed below the parent campaign.
- If a Control Group was configured, it appears at the top of the expanded list, above the variants.
- Control Group metrics show only Conversions (total and unique) and Revenue. All other metrics are displayed as N/A.
Winner Indicator
- Once the A/B test window ends and a winner is declared, a Crown icon appears next to the winning variant in the list.
- The winning variant continues to deliver to the remaining audience in the Running state.
- The parent campaign continues to show a Running status until both the test window and the campaign duration are complete. The campaign then moves to Completed.
Filtering Campaigns
Use the Campaign Type filter to narrow the campaign list. After selecting the Web Message channel, the Campaign Type dropdown offers:
- Regular Campaign
- A/B Campaign
- Split Campaign
Editing a Live Campaign
The fields available for editing depend on the campaign's current state. The table below summarises the editing rules.
| Campaign State | What Can Be Edited? |
|---|---|
| Scheduled (not yet started) | All A/B configuration fields are fully editable, including variants, winning criteria, test window, and audience distribution. This is the only state in which A/B configuration can be changed. |
| Running: during test window (Pre-winner) | Pause the campaign first. Then: Test Window duration and variant Content are editable. Winning Criteria, Audience Distribution, and Number of Variants are locked. |
| Running: post-winner declaration | Pause the campaign first. Then: Only the content of the Winning Variant is editable. All A/B configuration fields are locked. |
| Split Campaign (any state after launch) | Only the content of the variants can be modified. No configuration changes are permitted. |
NoteEditing the content of a running campaign does not reset the existing statistics (such as impressions and clicks) of the variants that you did not change.
Duplicating a Campaign
You can duplicate an existing A/B or Split Web Message campaign to quickly create a copy with the same configuration.
- All variants and their template content are cloned identically.
- The Admin Configuration defaults are not re-applied. The duplicate respects the settings of the original campaign, including Conversion Goal, Control Group, Winning Criteria, and Test Window.
- After duplicating, you can modify any configuration before publishing the new campaign.
Reporting
A/B and Split campaigns include enhanced reporting to help you analyse performance across variants.
Summary Report
The Summary Report CSV includes two additional columns at the end of the report for A/B and Split campaigns:
| Column | Description |
|---|---|
| Campaign Type | Indicates whether the campaign is Regular, A/B, or Split. |
| Message Type | Identifies the row as the control group or as a specific variant (for example, Variant A or Variant B). |
Additional reporting behaviour:
- All variants share the same Campaign Name but have different Campaign IDs.
- Control Group data appears as a separate row showing Conversion (total and unique) and Revenue metrics only. The Campaign Name and ID for the Control Group row match those of Variant A.
Detailed Report
To open the Detailed Report, click the report icon for the campaign. The Detailed Report includes additional fields for A/B and Split campaigns:
- Two new fields are available under the Campaign Details dropdown: Campaign Type and Message Type.
- If selected, these fields are included as columns at the end of the exported CSV.
- Control Group users appear in the Detailed Report with only the Conversion Event populated. All other event fields are empty.
Winner Declaration Logic (A/B Campaigns)
For A/B Campaigns, the platform automatically evaluates all variants at the end of the configured test window and selects a winner based on the chosen Winning Criteria.
How It Works
- The test window begins as soon as the campaign enters the Running state.
- During the test window, the audience is split equally among variants and performance data is collected.
- At the end of the test window, the platform compares variants using the selected Winning Criteria (Clicks or Conversions). The winner is declared within 5 minutes of the window closing.
- The variant with the highest metric value is declared the winner.
- The winning variant is automatically shown to the remaining audience for the rest of the campaign duration.
- A Crown icon marks the winner on the campaign listing page.
Tie-Breaker
If two or more variants are tied at the end of the test window, the winner is selected at random by Netcore's system to ensure fairness.
Audience Behaviour for Split Campaigns
Split Campaigns are designed for long-running, parallel tests where you want full control over the audience split and do not need automatic winner declaration.
- Sticky assignment: Each user (identified by cookie or user ID) is consistently shown the same variant across all sessions. A user who sees Variant A in their first session continues to see Variant A in subsequent sessions.
- All variants run for the full campaign duration. No variant is stopped early.
- The audience distribution is fully customisable. Adjust the sliders to allocate any percentage to each variant, as long as all percentages total 100%.
- Audience sizes of up to 10 million users are supported without degradation in delivery speed or platform performance.
For SDK integration details, refer to the Netcore CE Developer Documentation or contact your Netcore integration support team.
Updated 4 days ago