
Databricks
Integrate Databricks with Netcore's CE dashboard.
Overview
Databricks is a cloud data platform that data and marketing teams use to store, process, and analyze large scale customer data. Teams organize this data in catalogs, schemas, and tables. They query it through SQL warehouses.
Key features of Databricks include:
- Unified Data Platform: Store structured and semi structured customer data in one place and query it with standard SQL.
- SQL Warehouses: Run queries and data transfers on dedicated compute resources that scale independently of storage.
- Catalog, Schema, and Table Hierarchy: Organize data in catalogs, schemas, and tables, and control who can read each level.
- Service Principal Access: Let applications such as Netcore CE connect through a service principal with OAuth machine to machine (M2M) credentials, instead of a personal login.
- Wide Ecosystem Support: Connect to Databricks from analytics, BI, and marketing tools, including Netcore CE.
Data and marketing teams commonly use Databricks to maintain a single warehouse level view of customer attributes, such as segments, scores, and lifecycle stages, built from multiple source systems.
Netcore CE and Databricks Integration Overview
The Netcore CE and Databricks integration sets up a secure connection between Netcore CE and your Databricks SQL warehouse. Once connected, you sync customer attributes, events, and transactional data from Databricks into Netcore CE. You then use that data to power personalized campaigns, journeys, and segmentation.
The integration offers two integration types: Import from Databricks and Export to Databricks. This guide covers Import from Databricks. With this type, data flows from Databricks into Netcore CE.
Databricks Integration at a Glance
| Item | Detail |
|---|---|
| Integration name | Databricks |
| Category in Netcore CE | Data warehouse |
| Location in Netcore CE | Settings > Integrations |
| Integration type covered in this guide | Import from Databricks |
| Data direction | Databricks to Netcore CE |
| Default authentication method | OAuth M2M |
| Required connection details | Connection name, Client ID, Secret key, Server hostname, HTTP path |
| Next step after connecting | Import Data from Databricks to Netcore |
Benefits of Databricks Integration
- Warehouse Modeled Customer Data: Bring customer attributes that your data team already models and maintains in Databricks directly into Netcore CE contact profiles.
- Flexible Table Selection: Choose any catalog, schema, and table your connection can access, and preview a data sample before you import.
- Attribute Mapping with Auto Creation: Map Databricks columns to existing Netcore CE attributes. Create a new attribute on the fly if no matching attribute exists.
- One Time or Recurring Imports: Run a single import, or set a recurring schedule so Netcore CE keeps pulling incremental updates from Databricks automatically.
- List Ready Contacts: Add imported contacts to the Netcore CE contact master, and optionally to specific lists. You can use them in campaigns and journeys right away.
Use Cases for Databricks Integration with Netcore CE
- Warehouse Modeled Segmentation: Your data team maintains scores, RFM segments, or churn propensity models in Databricks. Import them into Netcore CE contact attributes to power targeted campaigns and journeys.
- Consolidated Identity Sync: Your team unifies customer records from multiple systems into a single customer view in Databricks. Import that view into Netcore CE to keep contact profiles current for engagement.
- Recurring Attribute Refresh: A recurring import keeps attributes such as loyalty tier, lifetime value, and last purchase date in sync with the latest values in Databricks. You avoid manual re-uploads.
Pre-requisites
Before you connect Databricks, make sure you have:
- Databricks account access.
- Read access to the required catalogs, schemas, and tables or views.
- Warehouse and table permissions for the service principal you plan to use.
- Network allowlisting, if your Databricks workspace requires it.
Also confirm the following:
- The service principal has access to the SQL warehouse, catalog, schema, and table or view you plan to import from.
- You have the OAuth Client ID and Secret key of that service principal.
- You have the Server hostname and HTTP path of your Databricks SQL warehouse.
Where to Find Your Databricks Connection Details
| Netcore CE field | Where to find it in Databricks |
|---|---|
| Client ID | The service principal's application (client) ID. |
| Secret key | The OAuth secret you generate for the service principal. Databricks shows the secret only once, so copy it when you create it. |
| Server hostname | The Connection details tab of your SQL warehouse. |
| HTTP path | The Connection details tab of your SQL warehouse. |
Connect Databricks Integration
Follow these steps to activate Databricks on the Netcore CE dashboard.
- Log in to the Netcore CE dashboard and navigate to Settings.
- Click Integrations. Under the Data warehouse category, select Databricks. The card reads "Sync Databricks data with Netcore to trigger timely, personalized engagement."
- An Integration panel opens. It shows an overview of the integration, the pre-requisites, and links to About Databricks and Configuring Databricks.
- Under Integration type, select Import from Databricks.
- Click ADD INTEGRATION. The button stays disabled until you select an integration type.
Basic Details
Refer to the table below for the fields on this screen.
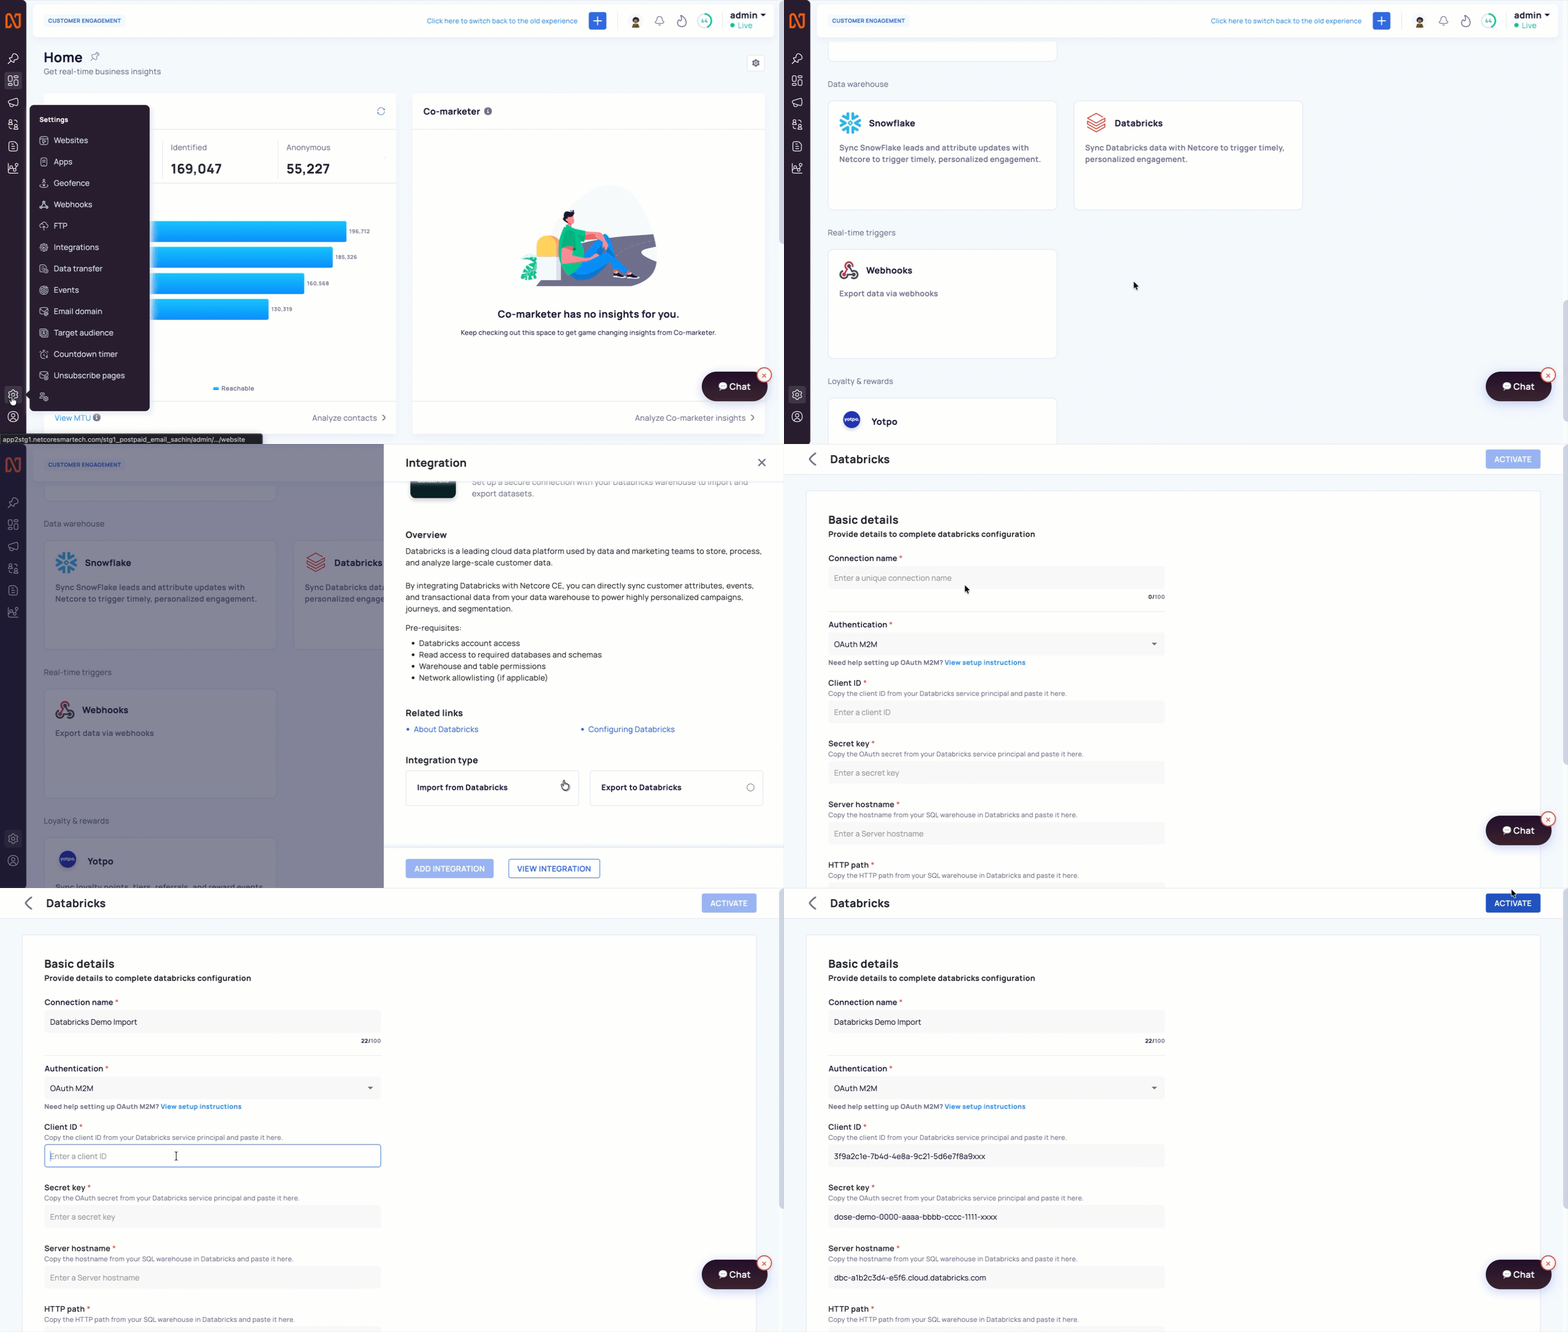
Provide Details to complete Databricks Configuration
| Field name | Description |
|---|---|
| Connection name | A unique internal name that identifies this Databricks connection. Up to 100 characters. |
| Authentication | The authentication method for the connection. OAuth M2M is the default. A View setup instructions link appears below the field. |
| Client ID | The client ID of your Databricks service principal. Copy it from Databricks and paste it here. |
| Secret key | The OAuth secret of your Databricks service principal. Copy it from Databricks and paste it here. Netcore CE masks the value after you save the connection. |
| Server hostname | The hostname of your Databricks SQL warehouse, for example dbc-xxxxxxxx-xxxx.cloud.databricks.com. |
| HTTP path | The HTTP path of your Databricks SQL warehouse, for example /sql/1.0/warehouses/<warehouse-id>. |
You must fill in every field. A Steps to follow panel on the same page repeats the key setup notes:
- Ensure you have access to the required SQL warehouse, database, schema, and table or view in Databricks.
- Select an authentication method and enter the required credentials.
- Enter the required Databricks connection details.
- Make sure the credentials have read access to the specified warehouse, database, schema, and table or view.
- Activate the connection to verify your details.
Click ACTIVATE after you fill in all required fields. The button stays disabled until the required fields are complete. Netcore CE uses the details to verify the connection when you activate it.
NoteTreat the Client ID and Secret key like a password. Share them only with people who manage your Databricks integration.
Managing an Existing Connection
After you activate a connection, an ACTIVATED badge appears at the top of its detail page. You manage connections from Settings > Integrations > Connected.
Each connection appears as a card that shows the integration name, the integration type (Import or Export), the connection name, and the date you added it. Click the three dot menu on a card to open these actions:
| Action | What it does |
|---|---|
| View | Opens the connection details in view only mode. |
| Deactivate | Deactivates the connection. |
| Remove | Removes the connection from your account. |
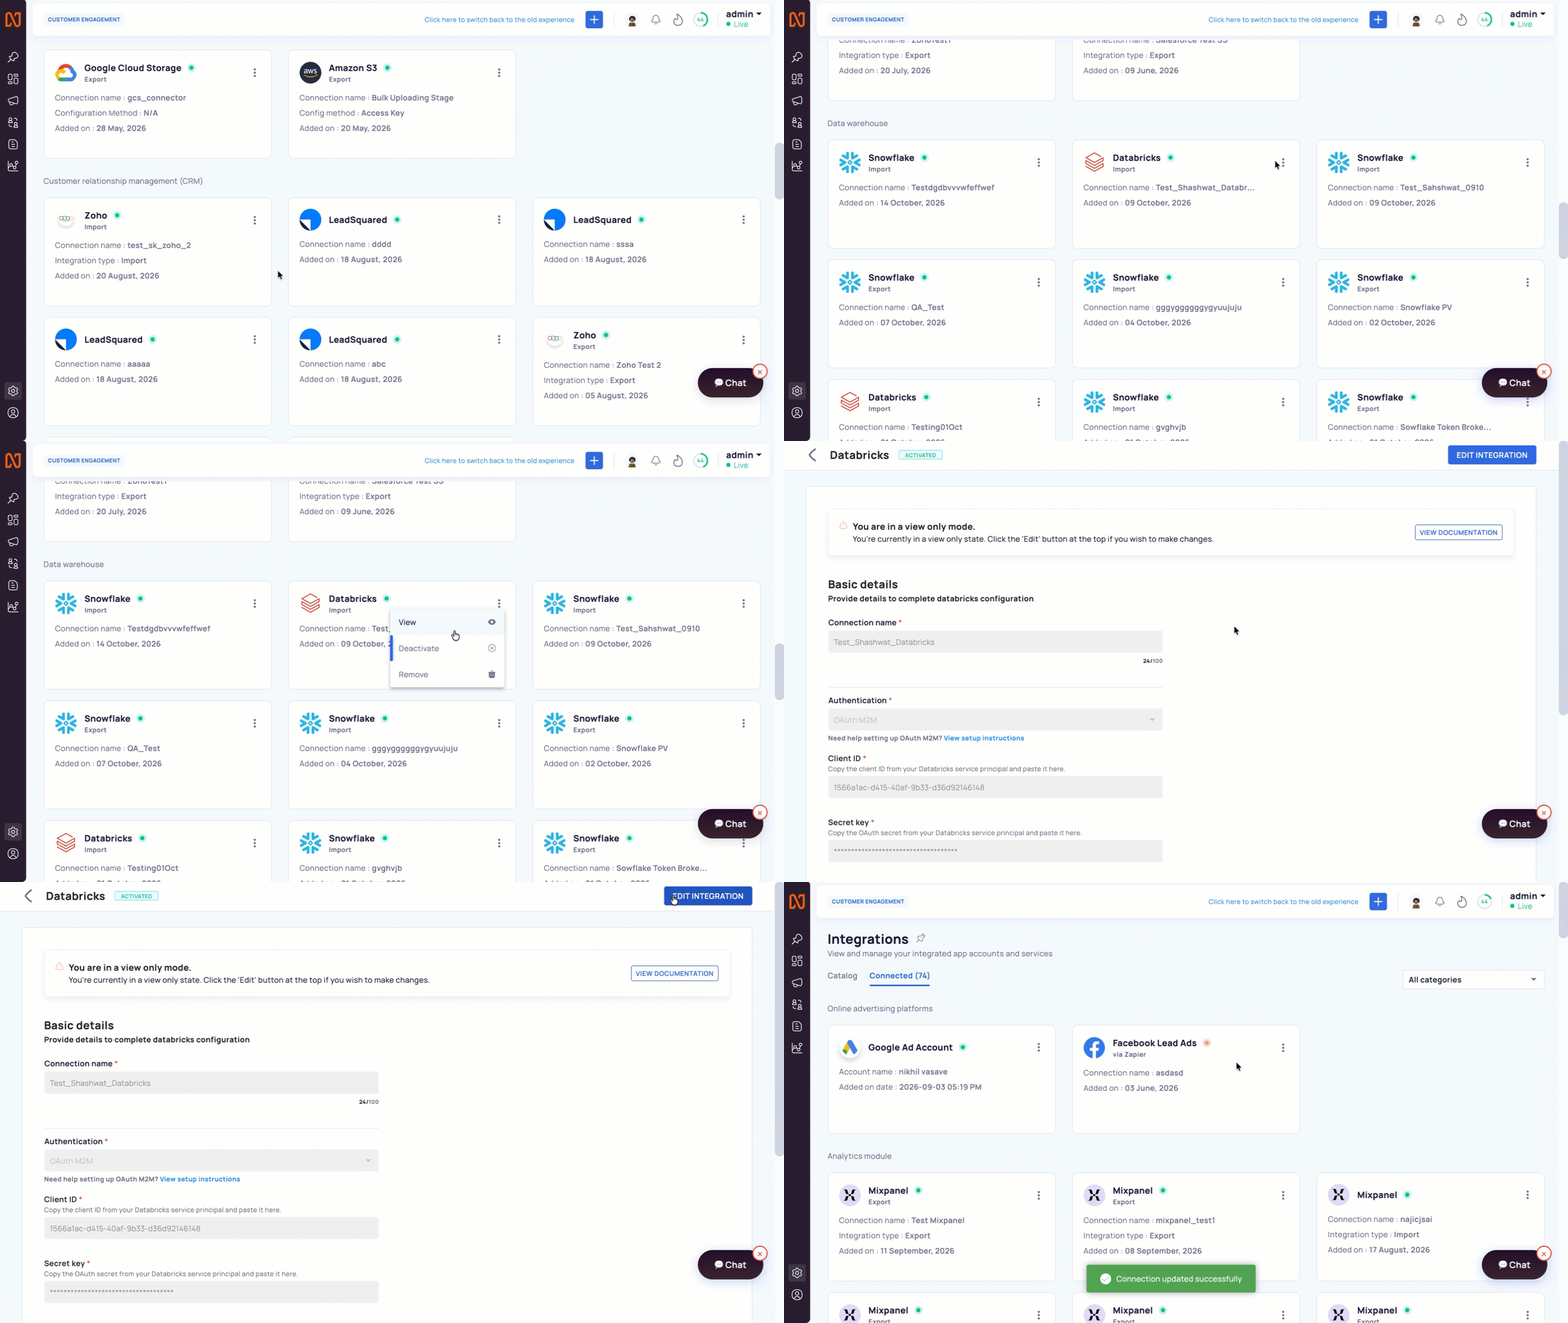
Manage an Existing Databricks Connection
Netcore CE opens an existing connection in view only mode. A banner reads "You are in a view only mode." Click EDIT INTEGRATION at the top of the page to change the saved details. Click VIEW DOCUMENTATION in the banner to open this guide.
Important Notes and Limitations
- This guide covers the Import from Databricks integration type. Data moves from Databricks into Netcore CE.
- Each connection card shows its integration type, Import or Export.
- The service principal needs read access to every catalog, schema, and table you want to import. Netcore CE cannot import data that the service principal cannot read.
- To import data with a Databricks connection that you set up here, see Import Data from Databricks to Netcore.
FAQs
What is the Netcore CE and Databricks integration?
The integration connects Netcore CE to a Databricks SQL warehouse. It lets you import customer attributes, events, and transactional data from Databricks into Netcore CE for campaigns, journeys, and segmentation.
Where do I set up the Databricks integration in Netcore CE?
Go to Settings > Integrations. Select Databricks under the Data warehouse category, and click ADD INTEGRATION.
Which authentication method does the Databricks integration use?
The integration uses OAuth M2M by default. You provide the Client ID and Secret key of a Databricks service principal.
Which details do I need to connect Databricks to Netcore CE?
You need a connection name, a Client ID, a Secret key, the Server hostname of your SQL warehouse, and the HTTP path of your SQL warehouse.
Does Netcore CE send data back to Databricks?
The Import from Databricks integration type moves data from Databricks into Netcore CE only. Netcore CE also lists an Export to Databricks integration type, which this guide does not cover.
How do I edit a saved Databricks connection?
Open the connection from Settings > Integrations > Connected, and click EDIT INTEGRATION. Netcore CE opens saved connections in view only mode until you click this button.
How do I import data after I connect Databricks?
Go to Settings > Data transfer > Import and follow Import Data from Databricks to Netcore.
Updated 1 day ago