
Export Data from Netcore to Snowflake
Send Netcore CE events to your Snowflake warehouse.
Overview
A Snowflake export sends Netcore CE event data to your Snowflake account. You choose the event, the fields, any changes to apply, and a schedule. The export has four steps: Setup, Data selection, Data customisation, and Schedule.
Pre-requisites
- Snowflake account access.
- A Snowflake role with the permissions that Netcore CE needs on the target warehouse, database, schema, and table. [CONFIRM: required Snowflake privileges for export]
- Network allowlisting, if your Snowflake account requires it.
- Your Snowflake account identifier and role name.
- A warehouse, database, schema, and table to receive the events. [CONFIRM: does the table need to exist, or does Netcore CE create it?]
Connect Snowflake for Export
You create the connection once. Then you use it in your exports.
- Log in to the Netcore CE dashboard and navigate to Settings > Integrations.
- Under the Data warehouse category, select Snowflake. An Integration panel opens.
- Under Integration type, select Export to Snowflake.
- Click ADD INTEGRATION.
- Fill in the Basic details. See the table below.
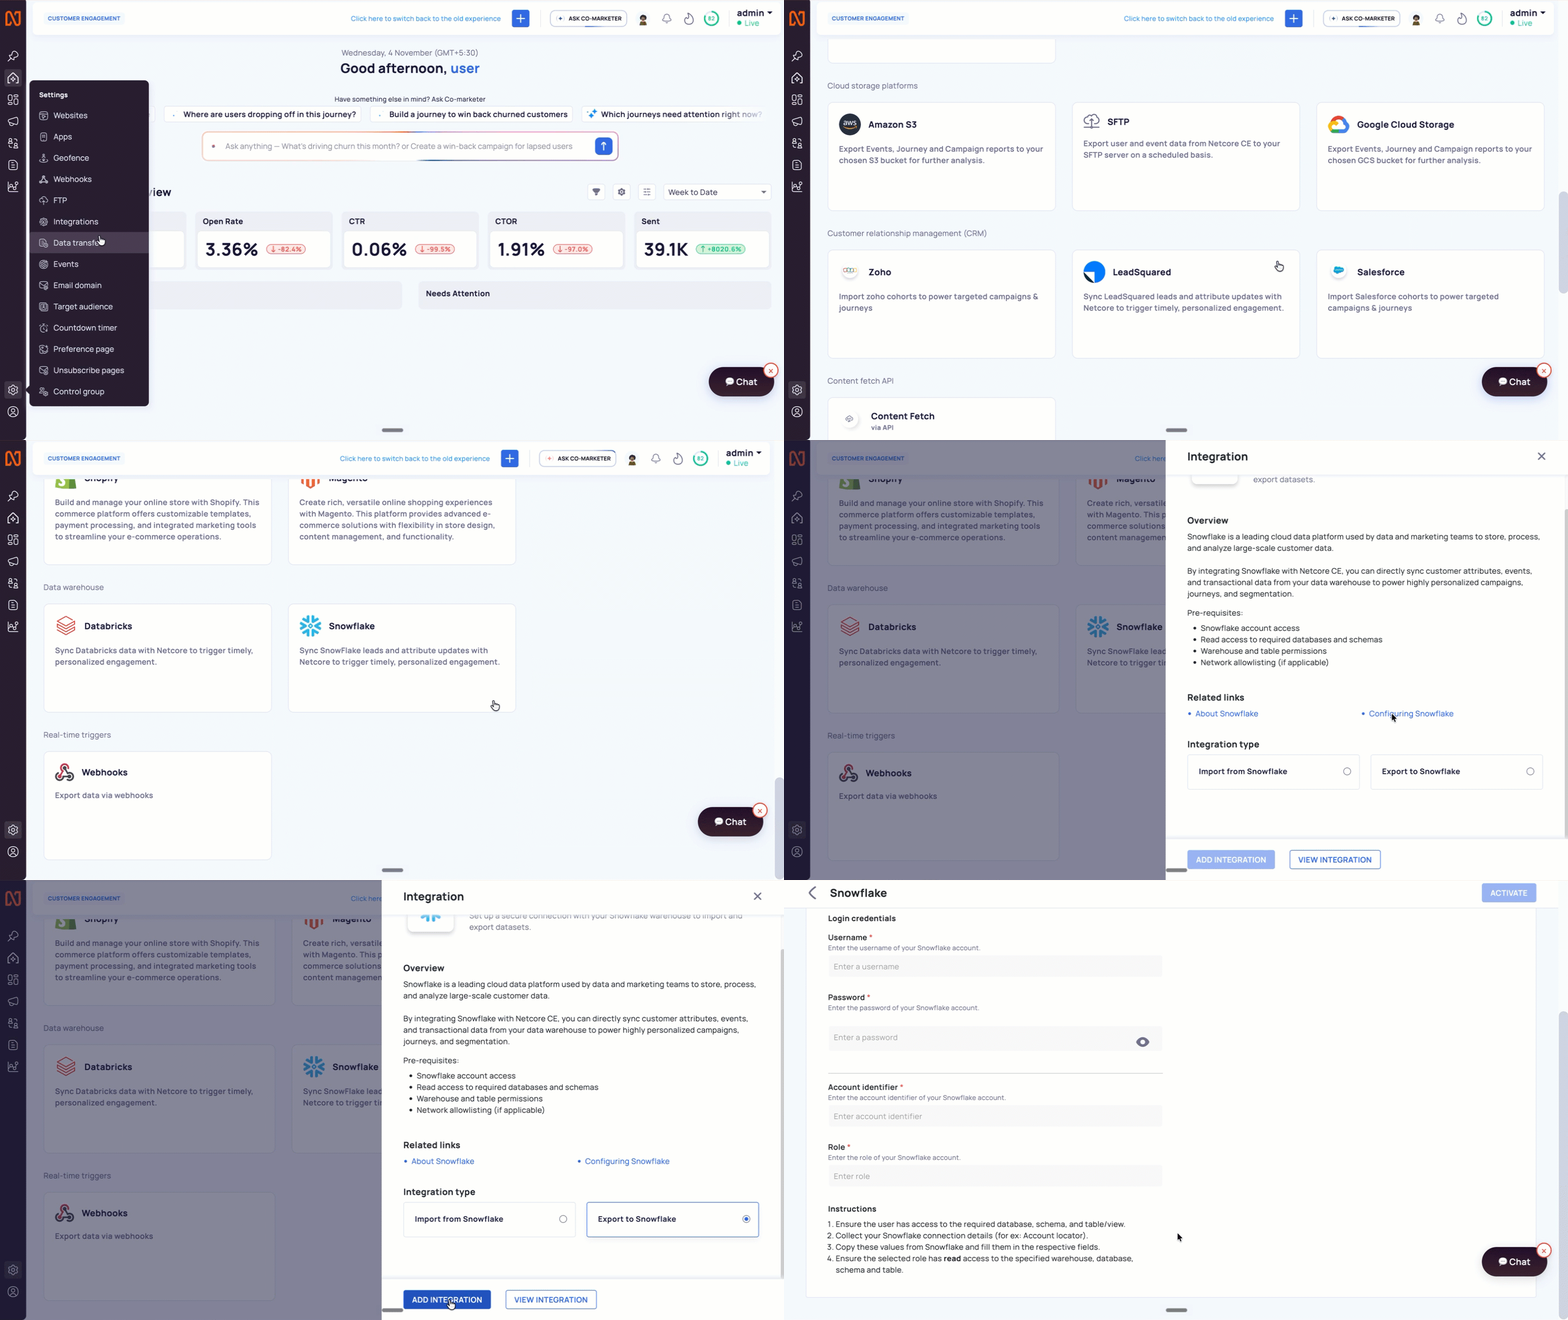
Connect Snowflake for Export
- Click ACTIVATE. The button stays disabled until you complete the required fields.
| Field name | Description |
|---|---|
| Connection name | A unique name for this connection. Up to 100 characters. |
| Authentication | Password or Key. |
| Username | The username of your Snowflake account. Required for both methods. |
| Password | The password of your Snowflake account. Appears only with Password authentication. Use the eye icon to show or hide it. |
| Key | A public key that Netcore CE generates. Appears only with Key authentication. |
| Account identifier | The account identifier of your Snowflake account. |
| Role | The Snowflake role for this connection. |
Use Key Authentication
- In Authentication, select Key.
- Netcore CE generates a public key and shows "API key generated successfully."
- Click COPY.
- Add the key to your Snowflake user. Follow the Snowflake help docs link under the key to set up key-pair authentication.
Click REGENERATE to create a new key. Add the new key to your Snowflake user.
Start a Snowflake Export
- Log in to the Netcore CE dashboard and navigate to Settings > Data transfer.
- Click the Export tab, then click CREATE NEW. A panel titled "How would you like to start?" opens.
- Select Export data.
- Under "What would you like to export?", select Events.
- Click NEXT. A panel titled "Select a destination to export your data" opens.
- Click Snowflake.
The export wizard opens. Click FINISH LATER at any point to save your progress.
Step 1: Setup
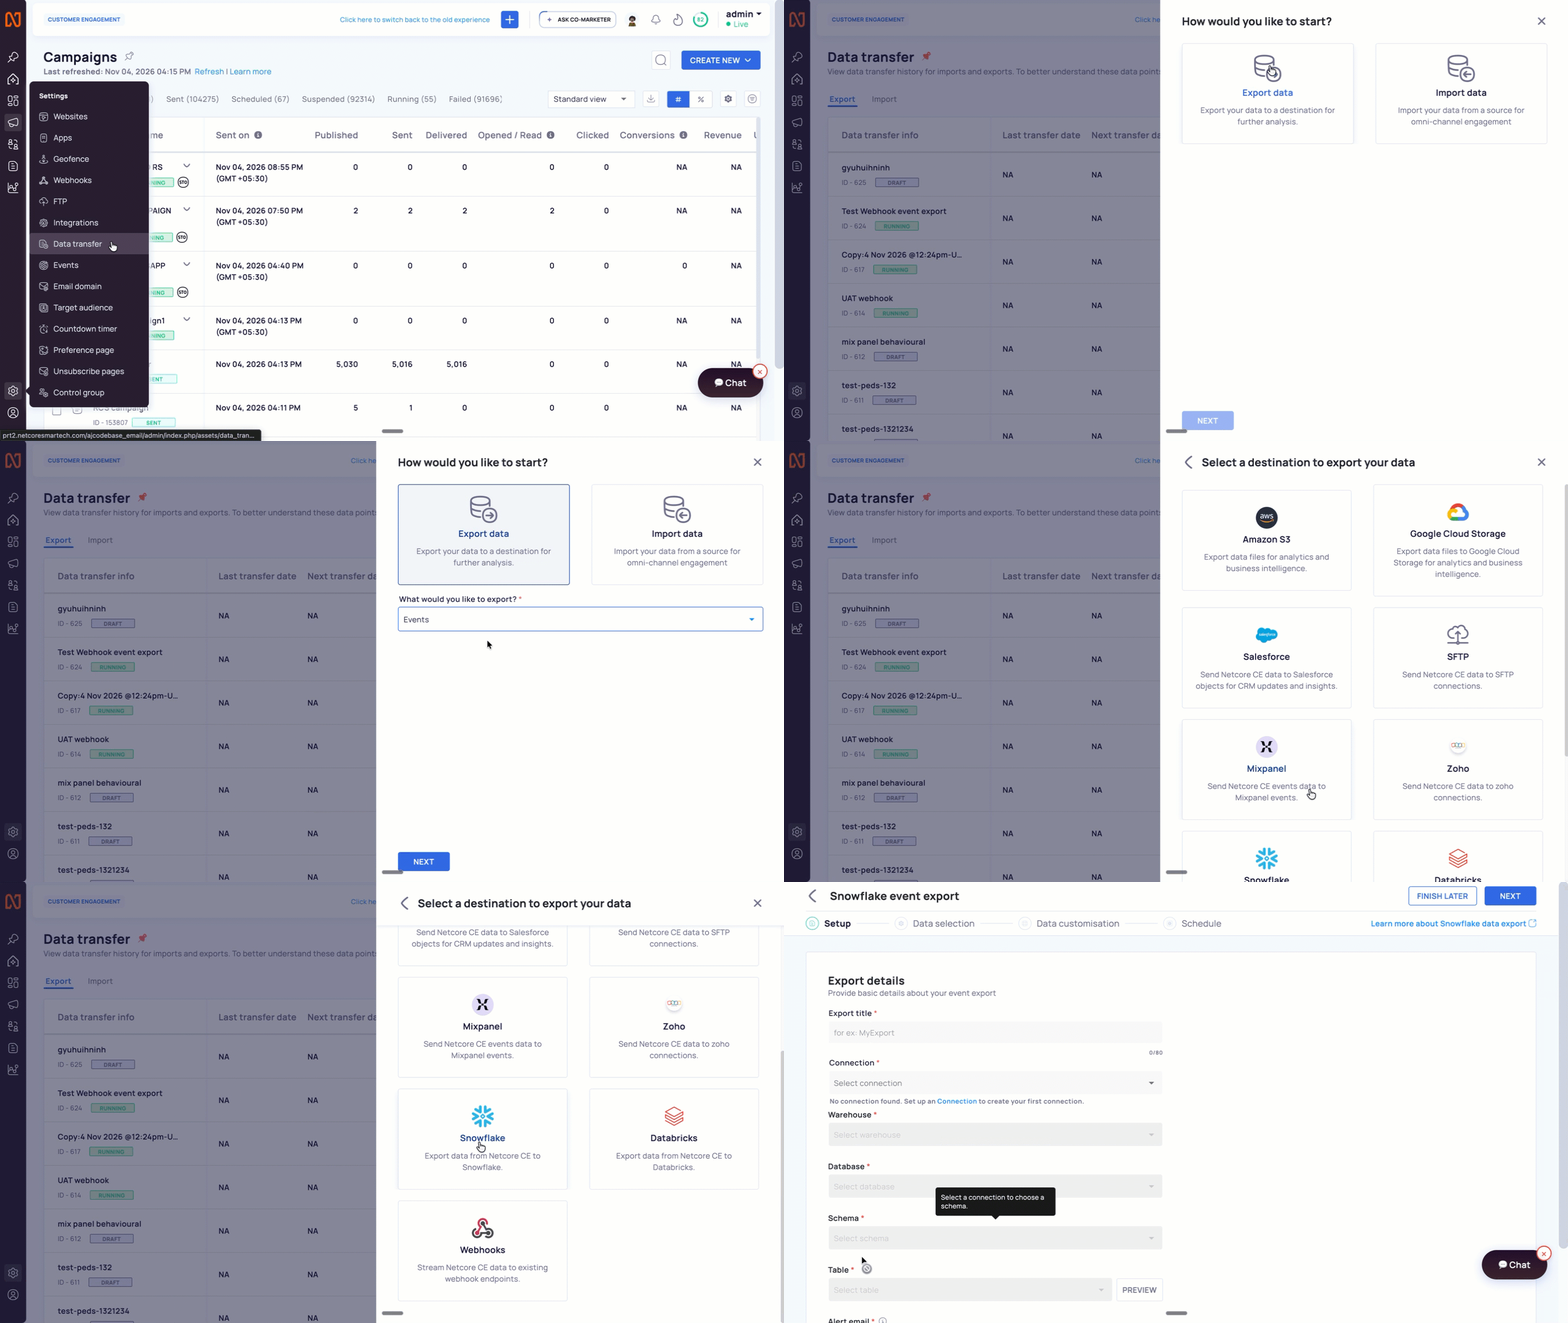
Provide Basic Details of your Export
Refer to the table below to see the fields available in the Setup section.
| Field name | Description |
|---|---|
| Export title | A unique name for this export. Up to 80 characters. |
| Connection | Select your Snowflake export connection. If none exists, click the Connection link to set one up. |
| Warehouse | Select the Snowflake warehouse to use. This field activates after you select a connection. |
| Database | Select the database that receives the events. This field activates after you select a warehouse. |
| Schema | Select the schema in that database. This field activates after you select a database. |
| Table | Select the table that receives the events. This field activates after you select a schema. |
| Alert email | Select the email addresses that receive alerts about this export. |
After you select a table, click PREVIEW to see sample records. Use it to confirm that you picked the right table.
Click NEXT. Click Learn more about Snowflake at the top right to open the help page.
Step 2: Data Selection
This step controls what data Netcore CE sends. The Data preview panel on the right lists the fields. It updates as you make changes.
- Under Events, select Engagement or Behavioural. Then select the events.
- Select the Event schema: Standard or Consolidated.
- Review the Standard field(s). Netcore CE adds them by default.
- Optional: Turn on Additional details and select the fields to include.
- Optional: Turn on Filters and select the values to filter by.
Click NEXT.
Step 3: Data Customisation
This step is optional. Use it to change the data before Netcore CE sends it.
- Turn on the Transformation toggle.
- Click + ADD to create a rule.
- Select the transformation and the target field.
| Transformation | What it does |
|---|---|
| Mask field | Hides the value of a sensitive field. |
| Rename column | Changes the column name. |
| Field to string | Converts the field to a string. |
| Date format | Changes the format of a timestamp. |
Click SEND TEST DATA to send a sample and check your setup. Then click NEXT.
Step 4: Schedule
- Select the start date and time.
- Select the end date and time. The export stops after this time.
- Select the Frequency, for example Daily, Weekly, or Hourly.
- Click SAVE or FINISH to activate the export.
Export Status and Monitoring
The Export tab of Settings > Data transfer lists every export. Each row shows the export title, its ID, a status badge, the destination, the frequency, and the total transfers.
Click the three-dot menu on a row to open actions such as Duplicate, Pause, and Stop.
FAQs
How do I export Netcore CE events to Snowflake?
Connect Snowflake with the Export to Snowflake integration type. Then go to Settings > Data transfer > Export, click CREATE NEW, and select Export data, Events, and Snowflake. Complete the four steps.
Which authentication methods can I use?
You can use Password or Key. With Key, Netcore CE generates a public key. You add it to your Snowflake user.
Which event types can I export?
You can export Engagement and Behavioural events.
Can I change the data before it reaches Snowflake?
Yes. In the Data customisation step, mask a field, rename a column, convert a field to a string, or change a date format.
Can I test the export before I start it?
Yes. Click SEND TEST DATA in the Data customisation step.
Can I schedule the export?
Yes. Set a start time, an end time, and a frequency in the Schedule step.
Can I save my progress and finish later?
Yes. Click FINISH LATER at any point in the wizard.
Related Pages
Updated 1 day ago